
Weeknights can feel like a rush, and finding something that’s both quick and satisfying can be a challenge. Turkey roll ups are my go-to because they hit that sweet spot — warm, cheesy, and ready in under 30 minutes. Plus, they make me feel like I’ve put a little effort into an everyday dinner, even when I’m exhausted after a long day.
There’s something about the simplicity of rolling turkey around melty cheese and herbs that just works. It’s honest food, no fuss, no complicated techniques, but still feels like a treat. I love how versatile they are — you can toss in whatever greens or spreads you have lurking in the fridge.
Focusing on how turkey roll ups can be a practical, no-fuss solution for weeknight dinners that still feel special, especially when you’re short on time but craving something warm and satisfying.
The inspiration behind this dish
- This recipe was born out of a frantic weekend when I needed something quick but still satisfying. I remember the smell of roasting turkey mixed with melting cheese filling the kitchen, making the chaos of that day fade away. It’s simple, honest comfort food that came from a need for fast, warm bites after a long, busy day.
- I started rolling slices of turkey around whatever cheese, herbs, and greens I had on hand. The first time, it was just a bit of cream cheese and chopped basil, but that little experiment turned into a regular go-to. It’s become my secret weapon for busy weeknights, a small act of culinary calm amidst the chaos.
- heading
- story_type
Key ingredients overview
- Turkey slices: I prefer thinly sliced turkey breast, which wraps easily and stays tender. You can swap with chicken if needed, but it won’t be quite as juicy.
- Cheese: Melted Swiss or provolone gives a nice gooey texture and mild flavor. For a sharper bite, go for aged cheddar; just watch it melt evenly.
- Herbs: Fresh basil or parsley add a bright, aromatic lift that cuts through the richness. Dry herbs work in a pinch, but they won’t be quite as vibrant.
- Greens: Spinach or arugula bring a fresh crunch and a slight peppery note. Wilt them slightly if you want less moisture inside the roll.
- Spreads: Cream cheese is my go-to for easy spreading and creamy texture; sour cream or Greek yogurt can work too, but they’ll be tangier.
- Seasonings: Salt and pepper are essentials, but a sprinkle of paprika or garlic powder can add depth. Use sparingly, as they intensify during cooking.
- Extras: Bacon bits or roasted red peppers can elevate the filling. Add just before rolling to prevent sogginess and keep textures distinct.
Spotlight on key ingredients
Turkey slices:
- I prefer thinly sliced turkey breast, which wraps easily and stays tender. You can swap with chicken if needed, but it won’t be quite as juicy.
- Cheese: Melted Swiss or provolone gives a nice gooey texture and mild flavor. For a sharper bite, go for aged cheddar; just watch it melt evenly.
- Herbs: Fresh basil or parsley add a bright, aromatic lift that cuts through the richness. Dry herbs work in a pinch, but they won’t be quite as vibrant.
Cheese and herbs:
- Cheese: Melted Swiss or provolone gives a nice gooey texture and mild flavor. For a sharper bite, go for aged cheddar; just watch it melt evenly.
- Herbs: Fresh basil or parsley add a bright, aromatic lift that cuts through the richness. Dry herbs work in a pinch, but they won’t be quite as vibrant.
Notes for ingredient swaps
- Dairy-Free: Use dairy-free cheese or hummus for creaminess, but expect a less gooey melt and a slightly different flavor profile.
- Low-Sodium: Opt for reduced-sodium turkey slices and cheese to control salt, though it may be a bit milder in flavor.
- Vegan: Replace turkey with thinly sliced marinated tofu or tempeh, and use vegan cheese for a plant-based version.
- Cheese Alternatives: Try goat cheese or ricotta for a tangier or creamier filling; they melt well but have distinct flavors.
- Herbs: Swap fresh herbs for dried ones if fresh aren’t available; dried herbs are more concentrated, so use sparingly.
- Greens: Kale or romaine can replace spinach or arugula; wilt slightly if you prefer less moisture inside the roll.
- Spreads: Swap cream cheese for mashed avocado or pesto for different flavor notes, but note the change in texture and moisture.
Equipment & Tools
- Sharp knife: To cut and prepare ingredients precisely.
- Spreading knife or spatula: To evenly spread spreads on turkey slices.
- Baking dish or sheet: To bake the rolled turkey until bubbly.
- Pan: To warm or slightly cook turkey slices for easier rolling.
Step-by-step guide to turkey roll ups
- Gather all ingredients: turkey slices, cheese, herbs, greens, spreads, seasonings. Set out a baking dish or sheet for assembly.
- Lay a turkey slice flat on a clean surface. About 15-20 seconds in a hot pan (around 180°C/350°F) can slightly warm it, making rolling easier. Don’t overcook; it should stay flexible.
- Spread a thin layer of your chosen spread (cream cheese, sour cream, etc.) across the center of the turkey slice. Use a butter knife or spatula, about 1 tablespoon per slice.
- Add cheese and herbs: a small handful of shredded cheese and chopped fresh herbs. Keep it balanced so it doesn’t spill when rolling.
- Place a few greens in a line at one edge of the turkey, slightly wilted if you prefer less moisture inside.
- Carefully roll up the turkey from the edge with greens, pressing gently to seal. If it tears, patch with a little spread and try again.
- Arrange the rolled turkey seam-side down in your prepared dish or on a baking sheet. Repeat with remaining slices.
- Preheat oven to 180°C (350°F). Bake the rolls for 10-12 minutes, until cheese is melted and edges are slightly golden.
- Once baked, let the rolls rest for 2-3 minutes to set. Drizzle with extra herbs or a squeeze of lemon if desired.
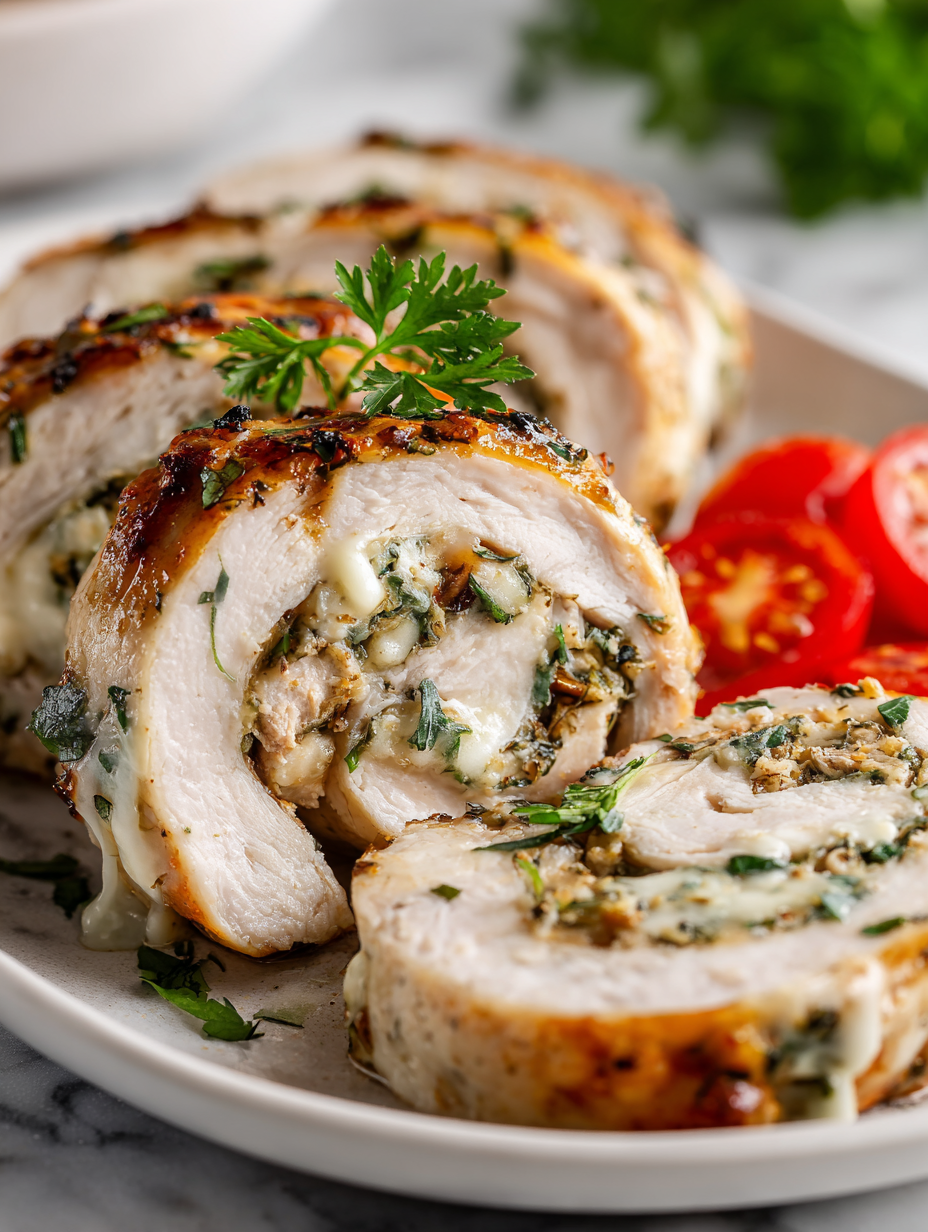
- Serve warm, sliced in half if you like, or whole. They should be tender, cheesy, and fragrant with herbs.
Let the rolls rest for a few minutes out of the oven to allow the cheese to set. Serve warm, sliced or whole, with a sprinkle of fresh herbs or a squeeze of lemon for brightness.
How to Know It’s Done
- Cheese is melted and gooey, with a lightly golden top.
- Turkey is tender with no raw or rubbery edges.
- Greens are wilted but still vibrant, not soggy or slimy.
Turkey Cheese Roll Ups
Ingredients
Equipment
Method
- Lay a turkey slice flat on a clean surface. If desired, briefly warm it in a hot pan for about 15 seconds to make it more pliable.
- Spread a thin layer of softened cream cheese evenly over the center of the turkey slice using a spatula or butter knife.
- Sprinkle shredded cheese over the cream cheese, then add chopped fresh herbs for a burst of aromatic flavor.
- Place a small handful of greens along one edge of the turkey, slightly wilted if you prefer less moisture inside.
- Gently roll up the turkey from the edge with greens, pressing lightly to seal the filling inside. If the roll tears, patch with a little spread and try again.
- Arrange the rolled turkey seam-side down in a baking dish or on a baking sheet, repeating with remaining slices.
- Preheat your oven to 180°C (350°F). Bake the rolls for 10-12 minutes until the cheese is melted and bubbling, with lightly golden edges.
- Remove from the oven and let the rolls rest for a few minutes; this helps the cheese set slightly for cleaner slices.
- Serve the turkey roll ups warm, sliced in half for presentation, garnished with extra herbs if desired.
Pro tips for perfect turkey roll ups
- Use thin slices: Thin turkey wraps easily and melts cheese faster, so aim for slices about 1/8 inch thick.
- Warm the slices: Briefly warming turkey in a hot pan (around 180°C/350°F) makes rolling smoother and prevents tearing.
- Spread evenly: Use a small offset spatula or butter knife to distribute spreads smoothly, avoiding lumps that can tear the turkey.
- Don’t overload: Keep fillings light—small handfuls of cheese and herbs are enough. Too much spills out and complicates rolling.
- Seal the seam: Press gently on the seam after rolling to help it stay closed during baking, using a tiny dab of spread if needed.
- Bake at right temp: 180°C (350°F) ensures cheese melts perfectly without over-browning, keeping rolls tender and gooey.
- Rest before serving: Let baked rolls sit for 2-3 minutes. This helps the cheese set and makes slicing easier without cheese oozing everywhere.
Common mistakes and how to fix them
- FORGOT to flatten turkey properly → Keep slices flat for even rolling and filling.
- DUMPED the filling too early → Wait for cheese to melt fully before rolling.
- OVER-TORCHED the rolls → Bake at 180°C (350°F) until cheese is bubbly and edges golden.
- Tucked in cold ingredients → Warm turkey slices slightly for easier rolling and better adhesion.
Quick fixes and pantry swaps
- If turkey slices stick, splash a little warm water to loosen and make rolling easier.
- When cheese isn’t melting, increase oven temp slightly or cover with foil for even heat.
- DUMPED too much filling? Patch with extra cheese or herbs to balance flavors before baking.
- When rolls crack open, gently press seams and chill briefly to help them hold shape.
- heading:
Prep, store, and reheat tips
- Prep the filling ingredients—herbs, spreads, and cheese—up to a day ahead. Keep them covered in the fridge, where flavors meld and intensify. The cheese may firm up slightly, but it’s easy to spread when brought to room temperature.
- Assemble the rolls a few hours before baking. Wrap them tightly in plastic wrap or store in an airtight container. They can sit in the fridge for up to 24 hours, though the greens might wilt a bit, so plan accordingly.
- Bake fresh for best texture and warmth. Reheat leftovers in a 180°C (350°F) oven for 10 minutes, until cheese is bubbly and rolls are heated through, with a pleasing aroma of melted cheese and herbs.
- For freezer storage, assemble the rolls unbaked, wrap well, and freeze for up to 2 months. Thaw overnight in the fridge before baking. Expect slightly less vibrant greens, but still deliciously cheesy and tender.
Common questions about Turkey Roll Ups
1. Can I use chicken instead of turkey?
Use thinly sliced turkey breast for easier rolling and tender bites. Chicken can work, but it might be less juicy.
2. Can I swap the cheese with something else?
Yes, you can substitute with cheese slices like cheddar or Swiss, or even vegan cheese if you prefer.
3. Should I heat the turkey slices first?
Warm the turkey slices briefly in a hot pan for 15-20 seconds to make rolling easier and prevent tearing.
4. What oven temperature and time are best?
Bake the rolls at 180°C (350°F) for 10-12 minutes until cheese is bubbly and edges are golden.
5. Can I make these ahead of time?
Yes, you can prepare the fillings ahead and assemble the rolls up to 24 hours in advance, keeping them refrigerated.
6. What if the cheese isn’t melting?
If the cheese isn’t melting properly, increase the oven temp slightly or cover the rolls with foil for even heat.
7. Can I use dried herbs instead of fresh?
Use fresh herbs like basil or parsley for vibrant flavor. Dried herbs can work but are less bright.
8. How long can I store leftovers?
Store leftovers in an airtight container in the fridge for up to 3 days. Reheat at 180°C (350°F) for about 10 minutes.
9. How much filling should I use?
Avoid overfilling to prevent spilling when rolling. Keep fillings light—about a tablespoon per slice.
10. Should I rest the rolls after baking?
Ensure the rolls rest for a few minutes after baking to let the cheese set, making slicing easier.
These turkey roll ups aren’t just quick to make—they bring a little bit of satisfaction after a chaotic day. The way the melted cheese mingles with herbs and tender turkey is a simple pleasure I come back to often.
They’re perfect for when you want something warm and filling without much fuss, especially as the season shifts and hearty, easy dinners feel just right. Sometimes, the best meals are the ones that come together with honesty and a little bit of love.