Getting that perfect sear on scallops isn’t about following a strict timer; it’s about feeling the heat and listening to the sizzle. I’ve learned to trust my senses—when the surface turns golden and the aroma shifts to a toasted sweetness, I know I’m close.
Timing and temperature are everything here. Too hot, and you risk burning the delicate flesh; too cool, and the scallops end up pale and rubbery. It’s a dance of patience and intuition, a small but satisfying challenge that rewards you with crisp, caramelized perfection and a tender inside.
This approach isn’t about a quick fix or about rushing through. It’s about tuning into each step, adjusting the heat, and watching for that perfect caramel glow. When done right, it’s a simple pleasure—scallops with a crispy crust and a melt-in-your-mouth center—that makes the effort totally worth it.
Focusing on the importance of timing and temperature control to achieve perfectly caramelized scallops with a crisp exterior and tender interior, emphasizing the chef’s tactile sense and intuition over strict recipes.
The tactile dance of perfect scallops
- I remember the first time I nailed that golden crust—pure relief and pride hit me all at once.
- Late nights in the kitchen, chasing that perfect sear, feels like a quiet victory every time.
- There’s a rush when the scallops crackle in the pan—like a small fireworks show for your senses.
- Sometimes I get impatient and overcook—learning to listen to that gentle sizzle has been a game changer.
- Sharing these scallops with friends, watching their eyes light up—nothing beats that moment.
The story behind this recipe
- I once had a small seafood shack in a coastal town where the chef swore by searing scallops as a test of patience. Watching him work, I realized it’s less about the recipe and more about feeling the heat and trusting your senses. That moment, I learned that a perfect sear isn’t just technique; it’s an act of intuition.
- Every time I cook scallops now, I think back to those salty air mornings and the quiet focus in that tiny kitchen. It’s a dance of timing and temperature, a little chaos mixed with calm, that results in that sweet, caramelized crust and tender inside. It’s honest work, but it always rewards with a fleeting, crispy bite that’s worth the effort.
- heading
- story_type
Historical and Cultural Tidbits
- Pan-searing scallops became popular in French cuisine in the early 20th century, emphasizing quick, high-heat cooking for perfect texture.
- Historically, scallops were considered a delicacy in coastal regions of Europe and North America, often reserved for special occasions.
- The technique of searing seafood over high heat dates back to ancient cooking methods used to quickly lock in flavor and moisture.
Ingredient breakdown
- Sea scallops: I look for plump, dry scallops with a pearl-like sheen—soggy or wet ones won’t sear well. You want that dry surface for maximum caramelization.
- Salt: I prefer sea salt for its clean, mineral punch—just enough to season without overwhelming. Skip overly salty salts to keep the delicate flavor front and center.
- Oil: I use a high-smoke-point oil like grapeseed or avocado—these handle high heat without smoking or burning, giving you that perfect crackle.
- Butter: I add a pat of butter at the end for richness and a nutty aroma—be careful not to burn it, or the flavor turns bitter.
- Lemon: Squeezing fresh lemon juice just before plating brightens the scallops—skip this if you prefer a richer, butter-only flavor.
- Pepper: Freshly cracked black pepper adds a subtle heat and crunch—don’t use pre-ground pepper, it can turn dull and flavorless.
Spotlight on key ingredients
Sea scallops:
- I look for plump, dry scallops with a pearl-like sheen—soggy or wet ones won’t sear well. You want that dry surface for maximum caramelization.
- Salt: I prefer sea salt for its clean, mineral punch—just enough to season without overwhelming. Skip overly salty salts to keep the delicate flavor front and center.
- Oil: I use a high-smoke-point oil like grapeseed or avocado—these handle high heat without smoking or burning, giving you that perfect crackle.
Lemon, Butter & Pepper:
- Lemon: I squeeze fresh lemon juice just before plating to brighten the scallops—bright, zesty, and a contrast to the rich butter.
- Butter: A small knob at the end adds richness and a nutty aroma—be cautious not to burn it, or the flavor turns bitter.
- Pepper: Freshly cracked black pepper adds a subtle heat and crunch—skip pre-ground to keep the flavor sharp and lively.
Notes for ingredient swaps
- Sea scallops: Fresh, dry scallops sear better with that golden crust. Frozen or wet scallops won’t caramelize as well; thaw and pat dry thoroughly.
- Salt: Sea salt or flaky finishing salt adds a clean mineral punch. Table salt is fine if used sparingly, but avoid overly seasoned salts that can overpower delicate flavor.
- Oil: Grape seed or avocado oil handles high heat without smoking, giving that crisp sear. If you only have olive oil, use it sparingly or finish with butter for flavor.
- Butter: Use unsalted butter for basting to control saltiness. Clarified butter or ghee can handle higher heat and add a nutty aroma—skip if avoiding dairy.
- Lemon: Fresh lemon juice brightens the dish with a zingy note. Lime or vinegar can substitute if needed, but lemon is traditional for that clean, bright finish.
- Pepper: Freshly cracked black pepper adds crunch and warmth. White pepper offers a milder heat, and skip if you prefer a more delicate flavor profile.
- Herbs: Parsley or chives add freshness after cooking. Dried herbs can be used but won’t have the same vibrant aroma or texture.
Equipment & Tools
- Heavy skillet: Ensures even heat for crisp searing.
- Tongs: Flip scallops carefully without breaking.
- Small spoon: Baste scallops with melted butter.
- Paper towels: Pat dry scallops to remove excess moisture.
Step-by-step guide to pan searing
- Equipment & Tools: Use a heavy-bottomed skillet—preferably cast iron—for even heat. Tongs for flipping, a small spoon for basting, and a paper towel for patting dry are essential.
- Pat the scallops dry with paper towels. Remove any side muscle. Season generously with sea salt on all sides.
- Heat your skillet over medium-high heat until it’s just starting to shimmer—around 200°C / 390°F. Add a tablespoon of grapeseed or avocado oil, swirling to coat.
- Place scallops in the hot pan, spaced apart. Do not overcrowd; work in batches if needed. Let them sear for about 2 minutes without moving, until edges are golden and caramelized.
- Flip each scallop carefully with tongs. Cook for another 1.5–2 minutes. During the last 30 seconds, add a small knob of butter and baste the scallops with the melting butter and oil mixture.
- Check for a golden crust and a slight jiggle in the center. If the surface is deeply golden and the scallops feel firm but still tender, they’re ready.
- Remove scallops from the pan, place on a paper towel-lined plate to rest for 1 minute. Drizzle with fresh lemon juice or serve immediately.
- Resting & Finishing: Rest scallops briefly on a warm plate. Finish with a squeeze of lemon and a sprinkle of cracked black pepper. Serve hot for best texture and flavor.
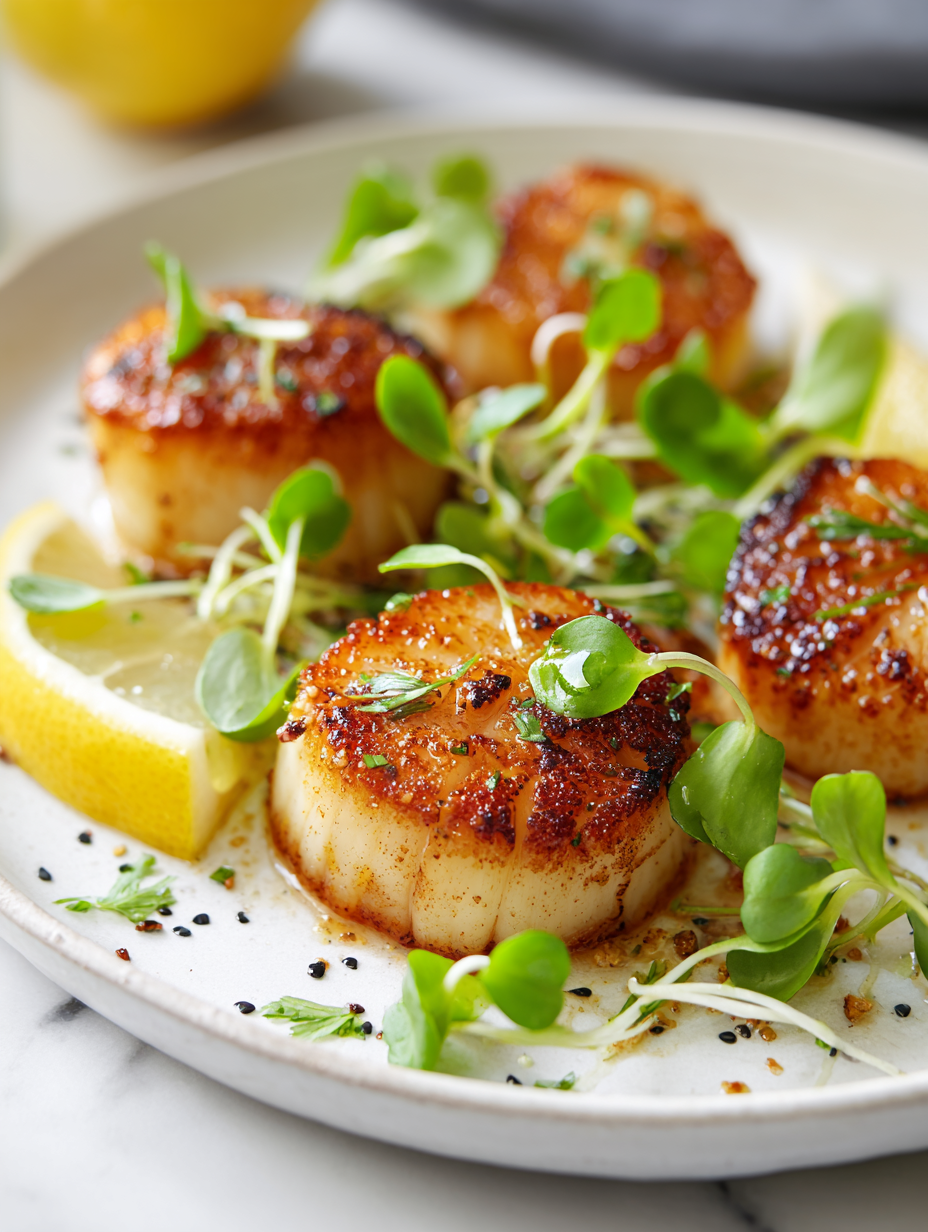
- Checkpoints & How to Know It’s Done: The exterior should be deep golden and slightly crispy; the interior tender and opaque; and they should jiggle gently when moved.
Rest scallops on a warm plate for 1 minute. Finish with a squeeze of lemon and cracked black pepper for brightness and aroma. Serve immediately for optimal texture.
How to Know It’s Done
- Golden brown crust with a slight caramel aroma.
- Scallops feel firm yet tender when gently pressed.
- Center is opaque and slightly translucent, not raw.
Perfect Pan-Seared Scallops
Ingredients
Equipment
Method
- Pat the scallops dry thoroughly with paper towels, removing any excess moisture and side muscles. Lightly season all sides with sea salt.
- Preheat your heavy skillet over medium-high heat until it’s just starting to shimmer, and add the grapeseed or avocado oil, swirling to coat the surface evenly.
- Carefully place the scallops in the hot pan, spacing them apart to prevent overcrowding. You should hear a lively sizzle as they hit the pan.
- Let the scallops sear undisturbed for about 2 minutes, watching for the edges to turn a deep golden brown and a caramel aroma to develop.
- Use tongs to flip each scallop carefully and continue cooking for another 1.5 to 2 minutes. During the last 30 seconds, add a small knob of butter to the pan and spoon the melted butter over the scallops to baste them, enhancing flavor and shine.
- Check that the scallops have developed a deep golden crust and feel firm but still tender when gently pressed. The center should be opaque, not raw.
- Remove the scallops from the pan and place them on a paper towel-lined plate to rest for about one minute. Squeeze fresh lemon juice over them just before serving for a bright, zesty finish.
- Finish with freshly cracked black pepper, then serve immediately while hot for the perfect crispy exterior and tender inside.
Pro tips for perfect scallops
- Dry scallops thoroughly: Use paper towels to pat them dry; moisture prevents that perfect crust from forming.
- Preheat your pan: Heat over medium-high until just shimmering—about 200°C / 390°F—to ensure a crackling sear.
- Don’t overcrowd: Cook in batches if needed. Overcrowding drops the pan’s temperature, resulting in steaming instead of searing.
- Let them sear undisturbed: 2 minutes without moving—wait for that deep golden crust to develop before flipping.
- Butter basting: Add butter at the last moment and spoon over scallops for rich flavor and a glossy finish.
- Check for doneness: They should feel firm but still tender, with a golden crust and opaque center—test with gentle jiggle.
- Rest briefly: Rest scallops for 1 minute on a warm plate, then serve immediately for the best texture and flavor.
Common searing mistakes and how to fix them
- FORGOT to pat scallops dry → They won’t sear properly, causing steaming instead of caramelization.
- DUMPED oil into pan too early → Preheat pan first; adding oil to a hot surface prevents sticking and ensures crust.
- OVER-TORCHED scallops → Reduce heat immediately; a burnt crust ruins texture and flavor, discard and start over.
- UNDERESTIMATED searing time → Let scallops sear undisturbed for 2 minutes; patience yields a perfect golden crust.
Quick fixes and pantry swaps
- When scallops release liquid, splash a little more oil and sear longer for crust.
- If scallops stick, ensure pan is hot enough before adding; a proper sear prevents sticking.
- Dumped oil smoking and burning? Patch with fresh oil and lower heat immediately.
- When scallops are over-torched, turn down heat and serve with a sauce to mask burnt flavor.
- Splash a few drops of lemon or vinegar if scallops are bland or dry before serving.
Prep, store, and reheat tips
- Pat scallops dry and season ahead of time; keep covered in the fridge for up to 2 hours to enhance flavor.
- Store seared scallops in an airtight container in the fridge; best eaten within 24 hours to preserve texture and flavor.
- Reheat gently in a warm skillet over low heat, just until warmed through and slightly crispy—avoid overheating to prevent rubbery texture.
- For best sensory results, reheat scallops until they emit a faint sizzle and are warm to the touch, maintaining their delicate exterior.
Top questions about pan seared scallops
1. Why do my scallops never get that crispy crust?
Pan searing scallops quickly cooks the outside to a golden crust while keeping the inside tender and moist. The key is high heat and minimal movement.
2. How dry should my scallops be before searing?
Make sure scallops are thoroughly dried before cooking. Excess moisture causes steaming, not searing, preventing that caramelized exterior.
3. What temperature should my pan be for searing?
Use a hot pan, about 200°C / 390°F, and avoid overcrowding. This ensures a quick, high-heat sear that caramelizes the surface.
4. How do I know when to flip scallops?
Flip the scallops only once, after they develop a deep golden crust, usually after about 2 minutes. Don’t move them too soon.
5. When should I add butter during cooking?
Add butter at the end for richness, and baste the scallops quickly to enhance flavor and create a glossy finish.
6. How can I tell when scallops are fully cooked?
Scallops are done when they feel firm but still tender, opaque in the center, and have a deep golden crust.
7. Should I rest scallops after searing?
Rest scallops for a minute after cooking to let juices redistribute, then serve immediately for best texture.
8. What equipment is best for searing scallops?
Use a heavy skillet like cast iron for even heat. Tongs help flip gently without tearing the delicate flesh.
9. Can I cook multiple scallops at once?
Avoid overcrowding the pan; sear in batches if necessary to maintain high heat and crispy crusts.
10. What if my scallops stick or burn?
If scallops stick or burn, turn down the heat immediately and add a little more oil or butter. Scrape off any burnt bits and start fresh if needed.
Perfectly seared scallops are a small miracle in the kitchen, a balance of heat, timing, and intuition. When you get that crust right, it’s a fleeting moment—crispy on the outside, tender within—that makes all the patience worth it.
This dish isn’t just about the technique; it’s about trusting your senses and embracing the chaos of the process. It’s simple, honest cooking that delivers big on flavor and texture, especially when you’re craving something special without fuss.

Hi, I’m Daniel Whitaker, the voice and recipe developer behind Broth Psychologist. I’m so glad you’re here. This little corner of the internet started as a way for me to share comfort through cooking, but it has grown into something much deeper.
 Hi, I’m Daniel Whitaker, the voice and recipe developer behind Broth Psychologist. I’m so glad you’re here.
This little corner of the internet started as a way for me to share comfort through cooking, but it has grown into something much deeper.
It’s where food meets feeling, and where simple ingredients tell meaningful stories.
Hi, I’m Daniel Whitaker, the voice and recipe developer behind Broth Psychologist. I’m so glad you’re here.
This little corner of the internet started as a way for me to share comfort through cooking, but it has grown into something much deeper.
It’s where food meets feeling, and where simple ingredients tell meaningful stories.


