Making chocolate fondant is like chasing a sweet little mystery in your own kitchen. There’s something oddly satisfying about aiming for that perfect gooey center—so tempting yet tricky to get just right. It turns baking into a mini experiment, a balance of timing and intuition that feels both frustrating and oddly calming.
I’ve found that each oven is a little different, and that’s part of the charm. It’s not about perfection but about learning to read the signs—watching the edges firm up while the middle stays luscious and molten. That slight wobble when you gently shake the ramekin? That’s the magic moment, right before it’s finished, and I swear it’s a quiet little thrill every time.
Focusing on the unexpected joy of a slightly undercooked center, this chocolate fondant becomes a personal quest to balance gooey richness with just enough firmness, turning each baking session into a mini science experiment and a lesson in patience.
The art of balancing gooey
- There’s an almost rebellious joy in pulling a perfectly gooey fondant from the oven, knowing it’s just on the edge of chaos.
- Baking these reminds me of childhood, the smell of melting chocolate filling the house and that instant craving for something rich.
- Getting the timing right feels like a small victory, each batch teaching me a little more about patience and instinct.
- I love how each forkful is a mix of warm, intense cocoa and that silky, almost liquid center—pure indulgence.
- There’s a quiet pride in serving a dessert that looks fancy but is honestly just a matter of timing and a little bit of luck.
The story behind this recipe
- This recipe came from a night when I was craving something rich but also wanted a little thrill of imperfection. I love how a slightly underbaked center reveals itself, almost like a secret waiting to be discovered with each spoonful.
- Once, I watched a friend struggle with overbaking her fondant, and I realized that embracing the slight wobble makes all the difference. It’s about trusting the process, even when the edges look a bit firm and the middle still jiggles—a moment of quiet triumph when it’s just right.
- heading: ‘The art of balancing gooey’
Chocolate Fondant Trivia
- Chocolate fondant, also known as molten lava cake, was popularized in French patisseries in the late 20th century, blending the idea of a cake and a souffle.
- The secret to its divine gooey center lies in the precise balance of chocolate, butter, and eggs, making it a delicate science as much as an art.
- Some culinary historians trace the roots of fondant-like desserts back to medieval European kitchens, where rich chocolate was reserved for the aristocracy.
- The name ‘fondant’ refers to the melting, flowing texture—it’s literally a ‘melted’ or ‘soft’ chocolate experience in dessert form.
Ingredient breakdown
- Dark chocolate: I prefer a 70% cocoa bar—rich and slightly bitter, it balances sweetness. Swap with a good quality milk chocolate if you want milder flavor, but expect less intensity.
- Butter: Creamy, salted butter is my go-to—adds richness and smooths the batter. Unsalted works fine; just watch the salt level in the recipe to avoid over-salting.
- Eggs: Use large, fresh eggs—they give structure and that tender crumb. If you’re out, try a flaxseed or chia seed egg substitute, though texture might be slightly different.
- Sugar: Fine granulated sugar dissolves quickly, making the batter smooth. Brown sugar can add a caramel note but might alter the texture slightly—use sparingly.
- Flour: Just a touch of all-purpose flour keeps the fondant tender without making it dense. Almond flour can be a nutty alternative, adding richness, but may change the crumb.
- Cocoa powder: Unsweetened, natural cocoa powder deepens the chocolate flavor and enhances the color. Dutch-processed can be used for a mellower, smoother profile, but adjust for acidity.
- Optional flavorings: A splash of vanilla or a pinch of sea salt can heighten the chocolate notes. Smoked sea salt? Adds an unexpected depth and smoky aroma—try it for a twist.
Spotlight on key ingredients
Dark chocolate:
- I prefer a 70% cocoa bar—rich and slightly bitter, it balances sweetness. Swap with a good quality milk chocolate if you want milder flavor, but expect less intensity.
- Butter: Creamy, salted butter is my go-to—adds richness and smooths the batter. Unsalted works fine; just watch the salt level in the recipe to avoid over-salting.
- Eggs: Use large, fresh eggs—they give structure and that tender crumb. If you’re out, try a flaxseed or chia seed egg substitute, though texture might be slightly different.
Cocoa powder:
- Unsweetened, natural cocoa powder deepens the chocolate flavor and enhances the color. Dutch-processed can be used for a mellower, smoother profile, but adjust for acidity.
- Butter: Creamy, salted butter is my go-to—adds richness and smooths the batter. Unsalted works fine; just watch the salt level in the recipe to avoid over-salting.
- Eggs: Use large, fresh eggs—they give structure and that tender crumb. If you’re out, try a flaxseed or chia seed egg substitute, though texture might be slightly different.
Notes for ingredient swaps
- Dairy-Free: Swap butter for coconut oil or a dairy-free margarine. Expect a slightly different richness and a hint of coconut aroma.
- Vegan Chocolate: Use high-quality dark vegan chocolate and a flaxseed egg substitute. The result will be just as luscious but with a different depth of flavor.
- Sugar Alternatives: Replace granulated sugar with coconut sugar or maple syrup. Be aware of the moisture content and adjust baking time slightly.
- Gluten-Free: Substitute all-purpose flour with almond flour or gluten-free baking blend. The texture may be a bit denser but equally satisfying.
- Cocoa Powder: Dutch-processed cocoa can be replaced with natural cocoa powder for a more intense, slightly tangy chocolate flavor. Adjust acidity if using Dutch-processed.
- Butter: Olive oil or avocado oil can replace butter for a different flavor profile. Expect a subtle fruity note and slightly softer crumb.
- Extra Flavor: Add a teaspoon of instant coffee or espresso powder to deepen the chocolate flavor without overpowering it.
Equipment & Tools
- Ramekins: To bake individual portions with controlled shape and size.
- Heatproof bowl: For melting chocolate gently over simmering water.
- Whisk: To beat eggs and sugar until fluffy and light.
- Spatula: To fold ingredients gently without deflating batter.
- Baking tray: To hold ramekins steady during baking.
- Knife: To loosen edges and invert fondants smoothly.
Step-by-step guide to chocolate fondant
- Preheat your oven to 200°C (390°F). Grease 4 ramekins with butter and dust with cocoa powder—set aside. Use a small brush for even coating.
- Chop 200g dark chocolate (70% cocoa) into small pieces. Melt in a heatproof bowl over simmering water (bain-marie) or in short bursts in the microwave, stirring until smooth and shiny. Cool slightly.
- In a separate bowl, beat 4 large eggs and 100g sugar until pale and slightly thickened, about 2 minutes with a handheld whisk. This helps incorporate air and improves texture.
- Add 100g melted chocolate to the egg mixture gradually, folding gently with a spatula. Keep the mixture smooth but don’t overmix—just enough to combine.
- Sift 30g all-purpose flour and 10g unsweetened cocoa powder into the batter. Fold in carefully until just combined. The batter should be glossy and thick enough to hold a slight peak.
- Divide the batter evenly among the prepared ramekins—about ¾ full. Tap gently on the counter to remove air bubbles and smooth the tops.
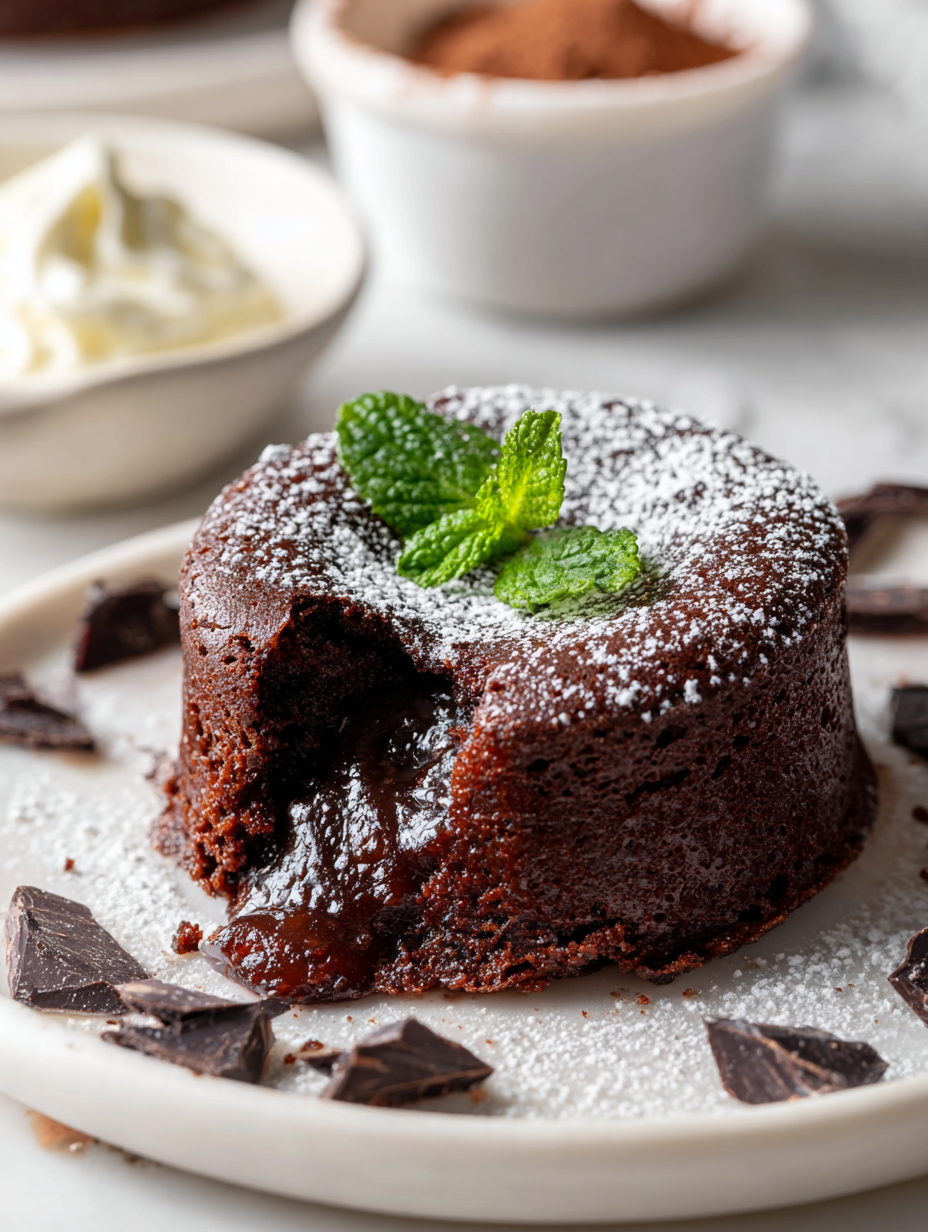
- Place ramekins on a baking tray and bake for exactly 12–14 minutes. The edges should be set, and the center still wobbly when gently shaken. The smell of melting chocolate will be intoxicating.
- Remove from oven and let rest for 2 minutes. Use a small knife to loosen edges, then invert onto plates. Let sit for 30 seconds before serving—this helps the fondant release cleanly.
- Serve immediately with a dusting of cocoa powder or a scoop of vanilla ice cream. The surface should crackle slightly as you cut in, revealing the gooey center.
- Enjoy the moment—the outer shell yields with a gentle press, exposing warm, molten chocolate that’s rich and velvety, with a lingering cocoa aroma.
Let the baked fondants rest for 2–3 minutes before gently inverting onto serving plates. Serve immediately for best gooey texture—pair with a dusting of cocoa or a scoop of vanilla ice cream for contrast.
How to Know It’s Done
- Edges are firm and slightly golden, center jiggles gently when shaken.
- A toothpick inserted in the center comes out with moist crumbs, not batter.
- The surface cracks when pressed, revealing molten interior.
Chocolate Fondant
Ingredients
Equipment
Method
- Preheat your oven to 200°C (390°F). Grease four ramekins with butter and dust with cocoa powder, tapping out any excess.
- Chop the dark chocolate into small pieces and melt it gently in a heatproof bowl over simmering water, stirring until smooth and glossy. Remove from heat and let cool slightly.
- In a separate bowl, whisk the eggs and sugar together until the mixture becomes pale, thick, and slightly fluffy—about 2 minutes. This helps incorporate air for a tender crumb.
- Gradually fold the melted chocolate into the egg mixture with a spatula, mixing gently until combined and smooth. Keep the batter shiny and thick.
- Sift the flour and cocoa powder into the batter. Carefully fold in until just combined, ensuring the mixture remains glossy and slightly thickened.
- Divide the batter evenly among the prepared ramekins, filling each about three-quarters full. Gently tap the ramekins on the counter to remove air bubbles and level the surface.
- Place the ramekins on a baking tray and bake in the preheated oven for 12 to 14 minutes. The edges should be set, and the center will still wobble slightly when shaken.
- Once baked, remove the ramekins from the oven and let them rest for about 2 minutes. Run a small knife around each edge to loosen, then carefully invert onto serving plates.
- Gently lift the ramekin away, revealing the cracked surface of the fondant with its warm, molten center. Serve immediately, perhaps with a dusting of cocoa powder or a scoop of vanilla ice cream.
- Enjoy the contrast of the crisp exterior with the silky, flowing chocolate inside—an indulgent treat that’s perfect for satisfying any chocolate craving.
Pro tips for perfect fondant
- Bolded Mini-Head: Use room temperature eggs to ensure a smooth, cohesive batter with a glossy finish.
- Bolded Mini-Head: Gently fold in the flour to avoid deflating the batter, preserving that delicate rise.
- Bolded Mini-Head: Chill the ramekins briefly after buttering and dusting—this helps prevent sticking and promotes clean release.
- Bolded Mini-Head: Bake just until the edges are set and the center still jiggles; overbaking kills the gooey interior.
- Bolded Mini-Head: Use a timer and visual cues—edges golden, center slightly wobbly—to master timing perfectly.
- Bolded Mini-Head: Run a thin knife around the ramekin’s edge before flipping—this looseness ensures a clean presentation.
- Bolded Mini-Head: Serve immediately after baking—resisting the urge to wait preserves that luscious molten core.
Common mistakes and how to fix them
- FORGOT to check oven temperature → Use an oven thermometer for accuracy.
- DUMPED batter into hot oven → Let batter cool slightly before baking to prevent curdling.
- OVER-TORCHED the edges → Use a dark-colored ramekin and bake at the right time for perfect edges.
- UNDER-baked center → Extend baking time by 1-minute increments, watch for jiggle and crackle.
Quick fixes and pantry swaps
- When batter is too thick, splash in a little warm water to loosen it.
- If center isn’t molten, extend baking time by 1-minute increments.
- Dumped batter into oven too cold? Chill ramekins before baking for an even rise.
- Over-torched edges? Shield with foil during the last minutes of baking.
- Splash a tiny bit of hot water around ramekins if fondants stick during inversion.
Prep, store, and reheat tips
- You can prepare the batter up to 2 hours in advance; keep it covered in the fridge. The richness and texture stay intact, but the batter will be slightly thicker—give it a gentle stir before baking.
- Assemble the ramekins filled with batter up to the baking stage. Cover tightly with plastic wrap and refrigerate for up to 24 hours. The cold batter might need an extra minute or two in the oven—watch for the edges setting and the center still wobbling.
- Baked fondants are best enjoyed fresh, but you can store them in an airtight container in the fridge for up to 1 day. Reheat in a 180°C (350°F) oven for about 4–5 minutes until warmed through—look for a slight crackle on the surface and a fragrant cocoa smell.
- Reheated fondant may lose some of its molten feel, but will still deliver that rich, velvety chocolate flavor. For the best experience, reheat just before serving and avoid microwaving, which can make the center rubbery.
Top questions about chocolate fondant
1. How do I know when my fondant is perfectly gooey?
A gooey center is achieved by baking just enough so the edges are firm but the middle still jiggles when gently shaken. Overbaking will turn it into a cake, underbaking might make it too runny.
2. What are the signs of perfect doneness?
Use a timer and look for golden edges with a center that wobbles slightly when shaken. The surface might crack, and a skewer should come out moist but not batter-y.
3. How do I fix an over- or under-baked fondant?
If the edges are too firm and the center is still liquid after baking, give it another minute or two. Conversely, if it’s too runny, bake a bit longer, checking every minute.
4. How can I prevent sticking and ensure a clean flip?
For a smoother surface, gently run a knife around the ramekin before inverting. To prevent sticking, thoroughly butter and dust with cocoa powder or flour.
5. How should I reheat leftover fondant?
Reheat in a warm oven at 180°C (350°F) for about 4–5 minutes until just warmed through. The center may firm up slightly but should still be luscious and molten.
6. Can I make this in advance?
You can prepare the batter up to 2 hours ahead, cover, and refrigerate. Baked fondants are best eaten fresh, but can be reheated quickly for a near-original gooeyness.
7. What are the key ingredients for this recipe?
Use high-quality dark chocolate, preferably 70% cocoa, for deep flavor. Unsalted butter adds richness, and fresh eggs give structure and a tender crumb.
8. Can I add flavor variations?
A splash of vanilla or a pinch of sea salt enhances the chocolate flavor. Smoked sea salt adds an unexpected smoky note, making the dessert more complex.
9. What are common mistakes during preparation?
Avoid overmixing the batter to keep it airy and light. Bake immediately after preparing to preserve the batter’s delicate structure.
10. What equipment do I need for perfect fondant?
Use ramekins that are evenly coated with butter and cocoa powder. Chill them briefly before filling to help release the fondant smoothly.
There’s something quietly satisfying about pulling a warm chocolate fondant from the oven, the smell of cocoa filling the room. It’s a small act of patience that rewards with a rich, velvety center that’s just barely set. No matter how many times I make it, that moment of cracking the shell and revealing molten chocolate still feels like a little secret.
In a way, this dessert is a reminder that sometimes, the imperfect—an extra second or two—can make all the difference. It’s messy, it’s indulgent, and it’s worth every bit of the effort. Warm, gooey, and just a little rebellious—this fondant is a quiet celebration of chocolate’s seductive pull.

Hi, I’m Daniel Whitaker, the voice and recipe developer behind Broth Psychologist. I’m so glad you’re here. This little corner of the internet started as a way for me to share comfort through cooking, but it has grown into something much deeper.
 Hi, I’m Daniel Whitaker, the voice and recipe developer behind Broth Psychologist. I’m so glad you’re here.
This little corner of the internet started as a way for me to share comfort through cooking, but it has grown into something much deeper.
It’s where food meets feeling, and where simple ingredients tell meaningful stories.
Hi, I’m Daniel Whitaker, the voice and recipe developer behind Broth Psychologist. I’m so glad you’re here.
This little corner of the internet started as a way for me to share comfort through cooking, but it has grown into something much deeper.
It’s where food meets feeling, and where simple ingredients tell meaningful stories.


