
Making baked eggs in a cast iron skillet isn’t about precision or perfect presentation. It’s about embracing the chaos—the little cracks, the uneven edges, the slightly overcooked bits—and loving the process anyway. There’s a raw, honest comfort in cracking eggs straight into a well-loved skillet and letting them cook in their own messy, delicious way.
This method feels like a kind of kitchen rebellion—no fuss, no fussiness, just a rustic, soulful way to serve breakfast or a quick dinner. The smell of eggs mingling with melted butter and maybe a hint of smoky paprika can turn even the most chaotic morning into a moment of quiet satisfaction. It’s honest food, made with your hands and a little bit of patience.
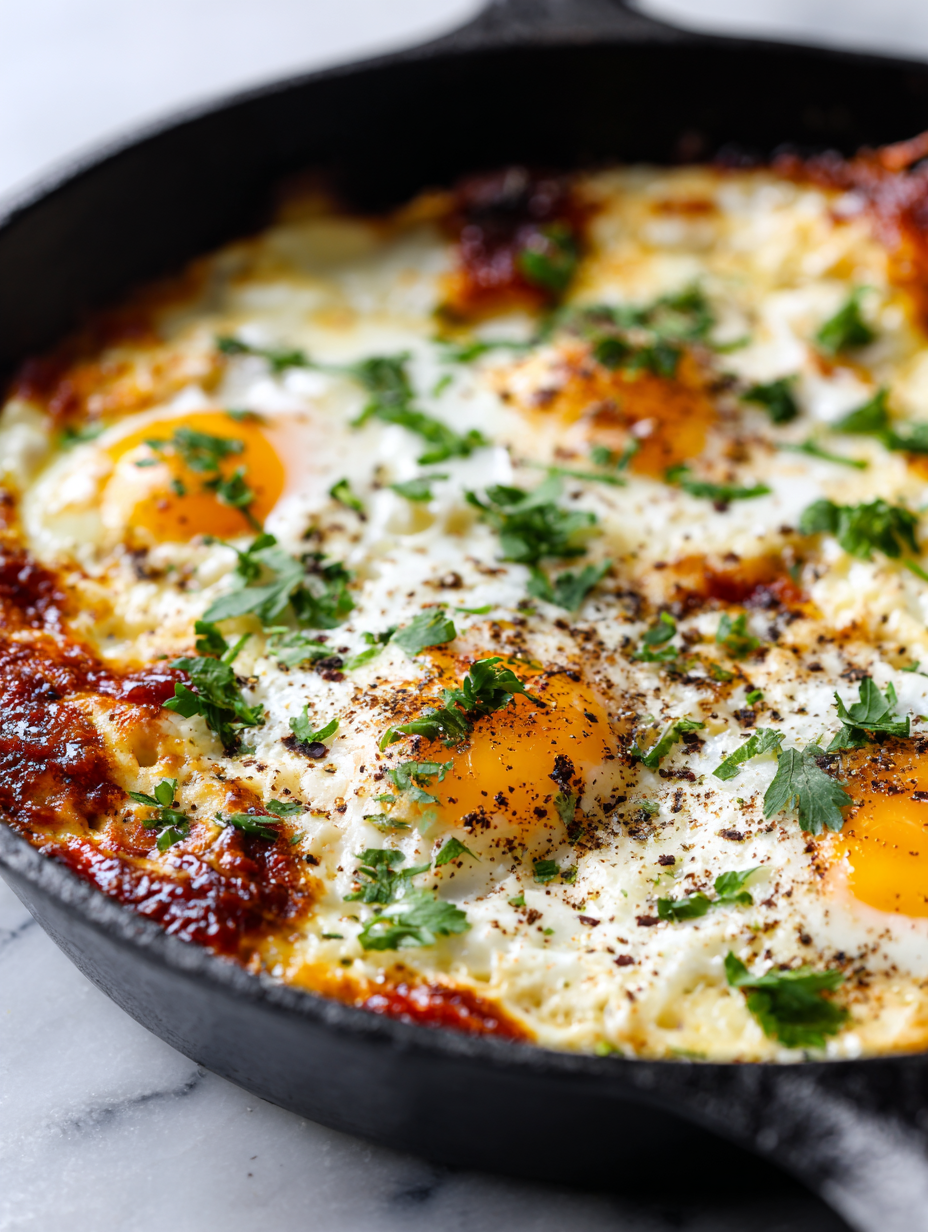
And honestly, there’s something deeply satisfying about the imperfect yolk, the slightly crispy edges, and the way the eggs jiggle just right when you finally slide that skillet onto the table. It’s not about perfection; it’s about the joy of making something with your own hands, flaws and all, and knowing it’s exactly what you need right now.
Focusing on the messy, imperfect process of making baked eggs in a rustic, well-loved cast iron skillet, highlighting the beauty in small flaws and the satisfying crack of a perfectly cooked yolk.
Embracing Kitchen Imperfections
- There’s a strange comfort in cracking eggs straight into a hot skillet and watching them transform in chaos.
- I love how the imperfect yolks remind me that beauty is in the flaws, especially in a rushed morning.
- Each crack in the edges feels like a small victory, a sign that I’m not aiming for perfection but for something real and satisfying.
- Cooking baked eggs this way makes me nostalgic for lazy weekends and spontaneous breakfasts with no fuss, just flavor and texture.
The story behind this recipe
- This baked eggs recipe came from a lazy Sunday morning when I was desperate for something warm and nourishing, but didn’t want to fuss with complicated techniques. I tossed together what was in the fridge—a few herbs, some cheese, and a dash of hot sauce—and let the eggs do their thing in the oven. The result was so simple, yet so satisfying, I started making it almost daily, tweaking ingredients based on what I had on hand.
- There’s a kind of quiet magic in baking eggs—no stirring, no timing stress, just patience and a bit of heat. It’s become my go-to for mornings when I crave comfort without effort, and I love how adaptable it is—every batch feels like a small, imperfect masterpiece. It’s honest food, made with a little bit of love, a little chaos, and a whole lot of flavor.
- heading: The story behind this recipe
Historical and Cultural Roots
- The concept of baking eggs in a dish dates back centuries in rustic European kitchens, where simple ingredients met heat in cast iron or ceramic vessels.
- In France, this method is often linked to the traditional ‘oeuf cocotte,’ a humble yet elegant way to serve eggs baked with herbs and cream.
- During wartime shortages, home cooks would improvise baked egg dishes using whatever bits of cheese or vegetables they had, creating a versatile, hearty meal.
- The popularity of baked eggs surged in recent years with the rise of comfort food trends, emphasizing imperfect, soulful cooking in casual settings.
Key Ingredients and Tips
- Eggs: I always use large, fresh eggs—there’s a noticeable difference in the yolk’s richness and the whites’ firmness. You want that oozy, bright yolk to peek through the whites.
- Butter: I love adding a generous pat of butter before baking—brings a nutty aroma and makes the edges crispy. Skip if you prefer a lighter version, but it’s a flavor boost.
- Cheese: A sprinkle of sharp cheddar or tangy feta melts into the eggs beautifully, adding creaminess and depth. Feel free to experiment with crumbled goat cheese for a tangy twist.
- Herbs: Fresh thyme or parsley brighten the dish with herbal freshness. Dried herbs work in a pinch but won’t deliver that vibrant aroma and flavour.
- Hot Sauce: Just a dash before baking adds a smoky kick that makes the eggs lively. Use your favorite, or skip if you want a milder taste but don’t skip the spice for that extra zing.
- Salt & Pepper: I always season generously—eggs need that boost of salt to really sing. Freshly cracked pepper adds a subtle heat and texture contrast.
- Optional Toppings: Crispy bacon bits or a handful of microgreens on top bring texture and color. Keep it simple or go wild depending on your mood.
Spotlight on key ingredients
Eggs:
- I always choose large, fresh eggs—they deliver that velvety yolk and firm whites that hold up during baking.
- Egg whites: They set beautifully, providing a tender base that contrasts with the runny yolk’s richness.
Butter:
- A generous pat melts into the whites, adding a nutty aroma and crispy edges that make each bite satisfying.
- Butter’s aroma: While baking, it fills the kitchen with warm, toasty notes that make the dish irresistible.
Notes for ingredient swaps
- Dairy-Free: Use coconut cream or almond-based cheese for creaminess; expect a slightly nutty or coconut aroma.
- Vegetarian: Swap out bacon bits for sautéed mushrooms or sun-dried tomatoes for umami and texture.
- Low-Sodium: Use herbs and spices more liberally instead of salt to keep flavor lively without the salt boost.
- Vegan: Replace eggs with silken tofu blended with a pinch of turmeric for color; it won’t jiggle but will mimic the texture.
- Spicy Kick: Incorporate hot paprika or a dash of cayenne into the eggs before baking for extra heat and smoky depth.
- Herbal Boost: Fresh basil or chives can replace parsley or thyme—bring bright, garden-fresh notes.
- Cheese-Free: Skip cheese altogether or add a dollop of dairy-free yogurt after baking for tang and creaminess.
Equipment & Tools
- Ovenproof skillet or ramekin: To hold and bake the eggs evenly.
- Stove: To gently start cooking the whites before baking.
- Spoon: To gently crack eggs and serve.
- Oven: To finish cooking the eggs evenly at a controlled temperature.
- Spatula (optional): To lift or serve the baked eggs carefully.
Guide to Perfect Baked Eggs
- Preheat your oven to 180°C (350°F). Find a small ovenproof skillet or ramekin—something with a little depth. Have a spoon ready for the eggs and toppings.
- Heat the skillet over medium-low heat. Add a small knob of butter (about a teaspoon). Let it melt slowly, smell that toasty butter aroma filling the kitchen.
- Crack two large eggs directly into the skillet, spacing them evenly. Be gentle—try not to break the yolks. You want the whites to settle without spreading too thin.
- Season generously with salt and pepper. If using herbs or chili flakes, sprinkle them now—whatever makes it feel custom. Let the eggs cook on the stove for about 1-2 minutes, just until the whites start to set around the edges, but yolks still look runny.
- Transfer the skillet to the oven. Bake for 8-10 minutes. Check at 8 minutes—look for whites that are just firm and yolks that jiggle slightly when shaken. The edges should be slightly crispy and golden.
- If you want cheese, sprinkle it on during the last 2 minutes of baking. It should melt into the whites, forming a gooey crust if you like it crispy. Keep an eye to prevent over-browning.
- Remove from oven. Let it rest for about a minute—eggs will be hot and the yolk should be beautifully runny but not raw. A quick sprinkle of herbs or hot sauce on top is the finishing touch.
- Serve straight from the skillet—no fuss, just a crack of bread or toast for dipping. The yolk should be velvety, the whites tender, and the edges crisp and slightly charred in places.
Let the eggs rest for 1 minute after removing from the oven. Finish with a sprinkle of herbs, hot sauce, or cheese if desired. Serve directly from the skillet for a rustic presentation.
How to Know It’s Done
- Yolk is bright and slightly jiggly, not raw or set.
- Egg whites are opaque and just firm at the edges, no runny bits.
- Edges of the eggs are crispy and golden, with a slight crackle when you poke them.
Rustic Baked Eggs in Cast Iron Skillet
Ingredients
Equipment
Method
- Preheat your oven to 180°C (350°F). Place your cast iron skillet on the stove over medium-low heat and add a teaspoon of butter. Let it melt slowly, filling the skillet with a warm, nutty aroma and a slight sizzle.
- Crack two large eggs gently into a small bowl first to avoid shells, then carefully slide them into the skillet, spacing them apart. The whites should spread gently, and you'll hear a soft sizzling sound. This step helps you control placement and prevents breakage.
- Season the eggs generously with salt and freshly cracked black pepper. Sprinkle chopped herbs over the top for freshness, and add any optional cheese if desired. Let the eggs cook gently on the stove for 1-2 minutes until the whites just start to set around the edges.
- Transfer the skillet to the preheated oven. Bake for 8-10 minutes, watching carefully. The whites should turn opaque and just firm, while the yolks remain bright and slightly jiggly. You may see crispy edges forming around the whites.
- Once baked to your desired doneness, carefully remove the skillet from the oven using oven mitts. If you like a spicy touch, drizzle a dash of hot sauce over the eggs now. Let them rest for a minute to settle, then sprinkle with additional herbs or cheese if wanted.
- Serve the baked eggs straight from the skillet, with crusty bread or toast on the side for dipping. The yolk should be velvety and runny, complemented by crispy edges and tender whites. Enjoy the rustic, imperfect beauty of this simple dish.
Notes
Pro tips for perfect baked eggs
- Bolded mini-head: Use room temperature eggs for a quicker, more even cook, avoiding cold center surprises.
- Bolded mini-head: Gently crack eggs into a small bowl first—this prevents shells and helps control placement in the skillet.
- Bolded mini-head: For crispy edges, increase oven temperature to 190°C (375°F) and bake for a minute longer, watching carefully.
- Bolded mini-head: Swirl butter around the skillet before adding eggs—this creates a golden, non-stick surface for a more rustic look.
- Bolded mini-head: Add herbs or cheese halfway through baking—this prevents overcooking and keeps flavors vibrant.
- Bolded mini-head: Use a silicone spatula to gently loosen edges if eggs stick—this avoids tearing and keeps presentation neat.
- Bolded mini-head: Rest the skillet for 1 minute after baking—this allows the yolk to thicken slightly and flavors to settle.
Common mistakes and how to fix them
- FORGOT to preheat the oven → Always preheat for even cooking.
- DUMPED eggs directly into hot skillet → Crack eggs gently into a bowl first.
- OVER-TORCHED edges → Cover edges with foil if they brown too quickly.
- MISSED checking for jiggle → Gently shake skillet to test yolk consistency.
Quick Fixes and Pantry Swaps
- When eggs stick, splash cold water around the skillet and gently loosen the edges.
- If yolks break, patch with a small piece of cheese or a dollop of sour cream for richness.
- Overcooked edges? Shield with foil and lower the oven temp slightly for even doneness.
- Dumped too much hot sauce? Splash a little cold water to mellow the heat quickly.
- When in doubt, pantry swap: use jarred roasted peppers instead of fresh herbs for smoky flavor.
Prep, store, and reheat tips
- You can prep the eggs by cracking them into a bowl and seasoning ahead of time; keep refrigerated and use within 24 hours for freshest whites and yolks.
- Assemble the baked eggs in the skillet up to a day in advance, cover tightly with plastic wrap, and store in the fridge. Bake just before serving for best texture.
- Leftover baked eggs will keep in the fridge for about 2 days. Reheat gently in the oven at 150°C (300°F) for 5-7 minutes until warmed through, watching for the whites to re-set and yolks to stay runny.
- Reheating can cause eggs to lose some creaminess and the edges to become a little rubbery. For a better result, reheat with a splash of water or broth over them to add moisture and prevent drying. The aroma will be milder, and the yolk may firm up slightly.
Top questions about baked eggs
1. Can I use older eggs for baked eggs?
Use fresh eggs for the best yolk consistency and whites that set just right, giving that velvety texture.
2. Are older eggs OK for baking?
Yes, but very fresh eggs will hold their shape better and give you that bright, runny yolk effect.
3. How long should I bake the eggs?
Preheat your oven to 180°C (350°F) and bake for about 8-10 minutes until whites are set but yolks remain runny.
4. How do I know when baked eggs are done?
Check at 8 minutes; the whites should be opaque and just firm, with a jiggle in the yolk that’s not raw.
5. What if the edges overcook?
If edges brown too quickly, cover with foil or reduce oven temp slightly to prevent over-browning.
6. Can I add toppings after baking?
Add a splash of hot sauce or herbs after baking for extra flavor; they enhance the rustic, imperfect charm.
7. How do I store baked eggs?
Store leftovers in the fridge for up to 2 days. Reheat gently in the oven at 150°C (300°F).
8. How do I reheat baked eggs?
Reheat in the oven for best results, or gently microwave for 30 seconds, watching for overcooking.
9. How can I prevent eggs from sticking?
Use a silicone spatula to gently loosen eggs if they stick, avoiding tearing and preserving presentation.
10. Can I make baked eggs dairy-free?
Yes, you can swap out cheese for dairy-free options like nutritional yeast or vegan cheese for a different flavor.
Making baked eggs in this rustic way reminds me that sometimes the best meals are the messiest. It’s about embracing the imperfect, letting the yolks jiggle just right, and loving the small flaws that make each dish unique.
This simple dish feels especially comforting now, when slow mornings and cozy kitchens are what we crave. It’s honest food—straightforward, satisfying, and a little chaotic, just like life itself.