This paneer yogurt bowl started as a way to make mornings feel a little more grounded, a bit less rushed. I’ve always loved the idea of turning leftovers or simple ingredients into something nourishing and satisfying, especially when I want breakfast to feel like a small act of care. The creaminess of the yogurt balances the chewy, slightly crispy paneer, giving you that comfort-food feeling in just a few minutes.
What really drew me in was how adaptable this bowl is—swap in whatever herbs or toppings you have lying around, and it still feels special. It’s like a little canvas for breakfast, one that’s both hearty and fresh, perfect for those mornings when you need a quick boost but don’t want to sacrifice flavor. It’s honest, straightforward, and honestly pretty forgiving—exactly how I like my mornings to be.
This recipe is inspired by the idea of turning a simple, everyday snack into a nourishing, comforting breakfast that bridges Indian flavors with a modern, quick-fix morning routine. It’s about reclaiming breakfast as a moment of calm, a bit indulgent, and genuinely satisfying, even on the busiest mornings.
The story behind this recipe
- This recipe came together on a lazy Sunday afternoon when I had some leftover paneer and a pot of plain yogurt that needed using up. I wanted something quick, nourishing, and with a bit of a nostalgic Indian twist that would remind me of childhood mornings at my grandma’s house, where simple ingredients felt like magic.
- The idea of combining creamy, mild yogurt with crispy, golden paneer felt like a perfect balance—comforting yet satisfying. I started experimenting with herbs and toppings, trying to capture that moment of quiet joy when flavors just click and feel like a small celebration in a bowl.
- heading: ‘The story behind this recipe’
Ingredient breakdown: key components
- Paneer: I love using firm, fresh paneer that’s slightly squeaky when you bite into it. If yours is on the softer side, keep an eye on cooking time to avoid melting away. For a smoky twist, try pan-frying until golden and fragrant.
- Greek Yogurt: I prefer a thick, tangy Greek yogurt for that creamy, luscious base. If you only have regular yogurt, strain it through a cloth for a few hours to get that rich texture—more like dessert than breakfast.
- Spices: Cumin and coriander seeds toast quickly in a dry pan, releasing a nutty aroma that anchors the dish. If you’re pressed for time, pre-ground spices work fine but toast them briefly for extra flavor.
- Herbs: Fresh cilantro and mint make all the difference, adding that burst of brightness. If fresh isn’t available, a little dried mint or parsley can still brighten up the bowl—just use sparingly.
- Toppings: Toasted nuts or seeds add crunch. I love slivered almonds or sunflower seeds—look for that slight shimmer of oil on the nuts when they’re perfectly toasted. If you want a sweeter contrast, a drizzle of honey works wonders.
- Lemon Juice: Brightens everything with its zingy, citrusy punch. Squeeze just before serving to keep that fresh, lemon-bright aroma. If you’re out, a splash of lime works almost as well.
- Olive Oil: A good drizzle adds richness and depth. I prefer a fruity extra-virgin olive oil, but if you only have a milder one, it’s still fine—just watch for that glossy shimmer on top.
Spotlight on key ingredients
Paneer and Yogurt:
- Paneer: I love using firm, fresh paneer that’s slightly squeaky when you bite into it. If yours is on the softer side, keep an eye on cooking time to avoid melting away. For a smoky twist, try pan-frying until golden and fragrant.
- Greek Yogurt: I prefer a thick, tangy Greek yogurt for that creamy, luscious base. If you only have regular yogurt, strain it through a cloth for a few hours to get that rich texture—more like dessert than breakfast.
Notes for ingredient swaps
- Dairy-Free: Coconut yogurt offers a rich, tropical flavor. It’s creamier and slightly sweeter, so adjust lemon and herbs accordingly.
- Vegan Protein: Tofu instead of paneer—firm tofu works well and absorbs flavors. Crisp it up like paneer for best texture.
- Herbs: Fresh cilantro and mint are ideal, but dried herbs like parsley or basil can be used in a pinch—just reduce quantity.
- Nuts & Seeds: Slivered almonds or sunflower seeds add crunch. For a nut-free option, toasted pumpkin or sesame seeds are good swaps.
- Lemon Juice: Fresh lemon brightens everything. Lime juice is a close second, with a slightly different tang—use it for a different zest.
- Olive Oil: Extra-virgin olive oil adds depth. For a lighter feel, a neutral oil like avocado oil works, but skip the fruity notes.
- Spices: Toasted cumin and coriander seeds deliver warm, nutty aroma. Ground spices are fine but toast briefly for maximum flavor.
Equipment & Tools
- Non-stick skillet: For even browning and easy flipping of paneer.
- Spatula: To turn and stir the paneer.
- Sharp knife: To cut paneer into cubes.
- Cutting board: Surface for chopping paneer and herbs.
- Small dry pan: To toast spices for maximum flavor.
- Mortar and pestle or spice grinder: To grind toasted spices.
Step-by-step guide to paneer yogurt bowl
- Equipment & tools: Use a non-stick skillet for easy flipping and less oil. Have a spatula, a sharp knife, and a cutting board ready.
- Cut the paneer into 1 cm (0.4 inch) cubes. Set aside. Heat a dry skillet over medium heat (about 160°C/320°F).
- Add the paneer cubes in a single layer. Cook for 3-4 minutes, then flip. Look for golden edges and a slight squeak when pressed.
- Continue cooking, stirring occasionally, until all sides are golden and crispy, about 6-8 minutes total. If they start to burn, lower the heat.
- While paneer cooks, stir the yogurt in a bowl until smooth. Add a pinch of salt, and set aside. Toast cumin and coriander seeds in a small dry pan over low heat (about 120°C/250°F) for 1-2 minutes until fragrant. Grind lightly.
- When paneer is crispy, remove from heat. Toss with toasted spices, a squeeze of lemon juice, and a drizzle of olive oil. Mix gently to coat.
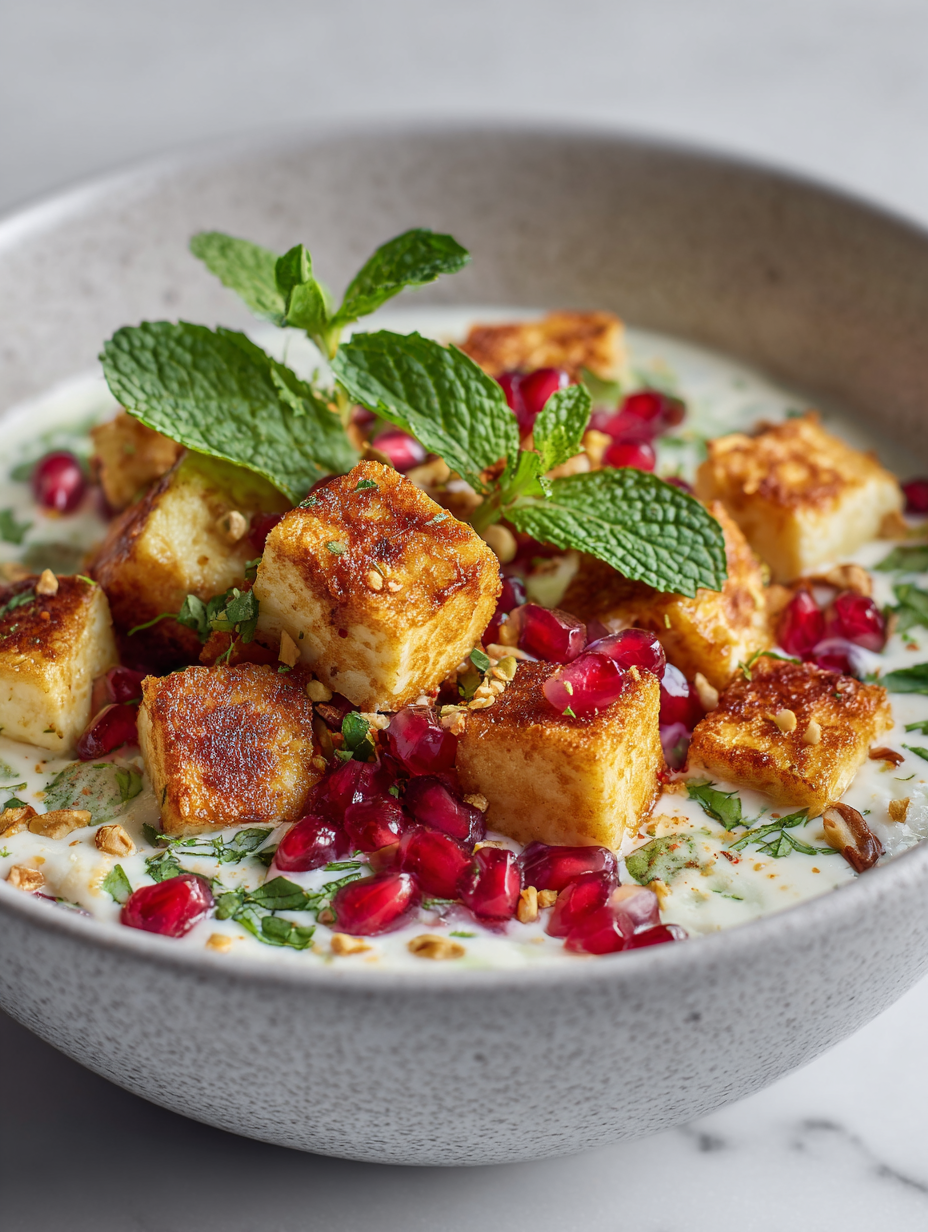
- Plate the yogurt as the base. Top with the hot, crispy paneer. Add fresh herbs, nuts, and a final drizzle of olive oil if desired.
- Resting & Finishing: Let the bowl sit for 2-3 minutes to meld flavors. Serve immediately with extra herbs or lemon wedges on the side.
- Checkpoints & How to Know It’s Done: The paneer should be golden and crispy, not burnt; the yogurt should be smooth and tangy; the toppings should be fresh and vibrant.
Serve immediately, allowing flavors to meld for 2-3 minutes. Garnish with extra herbs or a squeeze of lemon. Drizzle olive oil for extra richness.
How to Know It’s Done
- Paneer: golden and crispy edges, slight squeak when pressed.
- Yogurt: smooth, tangy, without separating or curdling.
- Toppings: fresh herbs vibrant, nuts toasted golden, oil shimmering.
Paneer Yogurt Bowl
Ingredients
Equipment
Method
- Start by heating a non-stick skillet over medium heat. Once hot, add the paneer cubes in a single layer and cook for 3-4 minutes, until they develop a light golden crust on the bottom.
- Flip the paneer cubes using a spatula and cook for another 3-4 minutes until all sides are crispy and golden. Keep an eye to avoid burning; the paneer should squeak slightly when pressed.
- While the paneer cooks, toast cumin and coriander seeds in a small dry pan over low heat for 1-2 minutes until fragrant. Grind the toasted seeds using a mortar and pestle or spice grinder to release their nutty aroma.
- In a bowl, whisk the Greek yogurt until smooth. Squeeze the juice of a lemon over the yogurt and stir well to brighten the flavor.
- Once the paneer is crispy and golden, remove it from the skillet and transfer to a plate. Drizzle with 1 tablespoon of olive oil, then toss gently with the toasted, ground spices and a squeeze of lemon juice for flavor.
- Spread the seasoned yogurt into bowls as a base. Top with the hot, crispy paneer cubes.
- Sprinkle chopped cilantro and mint over the top for freshness. Add toasted nuts or seeds for crunch, and finish with an extra drizzle of olive oil if desired.
- Serve immediately, allowing the flavors to meld for a few minutes. Enjoy the creamy, crispy, and herbaceous combination while the paneer is still warm!
Pro tips for perfect paneer bowls
- Use fresh paneer for a squeaky bite. If yours is soft, cook gently to avoid melting.
- For creamy yogurt, strain it overnight for a thick, dessert-like texture that holds up better.
- Toast spices until fragrant, then grind immediately to release full nutty aroma and flavor.
- When frying paneer, keep the heat moderate (around 160°C/320°F) for crisp edges without burning.
- Drizzle olive oil just before serving to enhance richness and add a glossy finish to the bowl.
- Squeeze lemon right before serving to keep the zing fresh and lively, not dull or muted.
- For extra crunch, toast nuts or seeds until they shimmer slightly, then sprinkle generously on top.
Common mistakes and how to fix them
- FORGOT to monitor pan temperature → keep it medium for even browning.
- DUMPED the spices before toasting → toast until fragrant, then grind for full flavor.
- OVER-TORCHED the paneer → cook until golden, not burnt, to maintain crispness.
- SKIPPED resting time → let the bowl sit for 2 minutes to meld flavors and prevent separation.
Quick fixes and pantry swaps
- When pan-smoke occurs, splash a little water to tame the flames and reduce smell.
- If paneer sticks, patch with a splash of oil and gently loosen with a spatula.
- When yogurt separates, shield with a spoonful of fresh yogurt and stir gently.
- Splash lemon juice if flavors are dull or if paneer is undercooked for brightness.
- When in doubt, pantry swap cumin seeds for smoked paprika for a warm, smoky aroma.
Prep, store, and reheat tips
- Prepare the yogurt mixture and chop herbs a day in advance; store in airtight containers in the fridge for up to 2 days. The flavors develop slightly overnight, making mornings easier.
- Cook and crisp the paneer ahead of time; keep in a sealed container in the fridge for up to 24 hours. Reheat in a hot skillet for a few minutes to restore crispness before serving, watching for slight sizzling and golden edges.
- Toast spices in advance and grind as needed; store in a small jar away from sunlight. The toasted aroma intensifies over time, so do this the day before for maximum flavor.
- Assemble toppings like nuts or seeds beforehand; keep in separate airtight containers. Toast just before serving if possible, but they will stay crunchy for a day in a sealed container.
- The assembled bowl is best enjoyed fresh, but leftovers can be refrigerated for up to 12 hours. Reheat paneer quickly in a skillet, then reassemble to keep textures lively and flavors bright.
Top questions about paneer yogurt bowl
1. How do I choose the right paneer?
Use firm, fresh paneer that’s slightly squeaky when you bite. Softer paneer needs gentler cooking so it doesn’t melt.
2. Can I use regular yogurt instead of Greek yogurt?
Strain regular yogurt through a cloth for a few hours to thicken it, making it creamy and dessert-like.
3. Should I toast and grind the spices?
Toast cumin and coriander seeds until fragrant, then grind to unlock full nutty flavor that enhances the dish.
4. How do I know when the paneer is perfectly crispy?
Cook paneer in a medium-hot skillet (around 160°C/320°F) until edges are golden and crispy, about 6-8 minutes.
5. When should I add lemon juice?
Add lemon juice right before serving for a bright, zesty flavor that lifts the entire bowl.
6. What toppings add the best crunch?
For extra crunch, toast nuts or seeds until they shimmer slightly and sprinkle on top just before serving.
7. Can I substitute dried herbs for fresh?
Use fresh herbs like cilantro and mint for vibrancy. Dried herbs can work but won’t give the same bright flavor.
8. How do I reheat the paneer without losing its texture?
Reheat the paneer briefly in a hot skillet to restore crispness before serving leftovers.
9. Can I prepare this bowl in advance?
Assemble the bowl just before eating to keep toppings fresh and yogurt creamy. Prepare ingredients ahead for quick mornings.
10. What do I do if the yogurt separates?
If your yogurt separates, stir in a spoonful of fresh yogurt or a splash of water to smooth it out.
This bowl isn’t just about flavor; it’s a gentle reminder to slow down and enjoy a moment of simple nourishment. The combination of crispy paneer and tangy yogurt feels like a little celebration in every bite, especially when topped with fresh herbs and a squeeze of lemon.
In times when breakfast feels rushed or uninspired, having this recipe in your back pocket can bring a quick dose of comfort and familiarity. It’s honest, straightforward, and a small act of care that’s easy to make any morning feel a bit more special.

Hi, I’m Daniel Whitaker, the voice and recipe developer behind Broth Psychologist. I’m so glad you’re here. This little corner of the internet started as a way for me to share comfort through cooking, but it has grown into something much deeper.
 Hi, I’m Daniel Whitaker, the voice and recipe developer behind Broth Psychologist. I’m so glad you’re here.
This little corner of the internet started as a way for me to share comfort through cooking, but it has grown into something much deeper.
It’s where food meets feeling, and where simple ingredients tell meaningful stories.
Hi, I’m Daniel Whitaker, the voice and recipe developer behind Broth Psychologist. I’m so glad you’re here.
This little corner of the internet started as a way for me to share comfort through cooking, but it has grown into something much deeper.
It’s where food meets feeling, and where simple ingredients tell meaningful stories.


