There’s a quiet joy in assembling a paneer snack plate that feels both rustic and personal. It’s not about perfect symmetry but about letting each piece tell its own story, like a messy but charming patchwork. I love the way the soft, spongy paneer plays off the crunch of fresh herbs and the smoky hint of spices—each bite a little imperfect masterpiece.
This plate is my go-to for casual get-togethers or when I want something quick and satisfying that still feels thoughtful. It’s a reminder that food doesn’t need to be polished to be beautiful or delicious. Sometimes, the best snacks come from a handful of leftovers and a bit of playful arrangement, embracing those little imperfections that make it real.
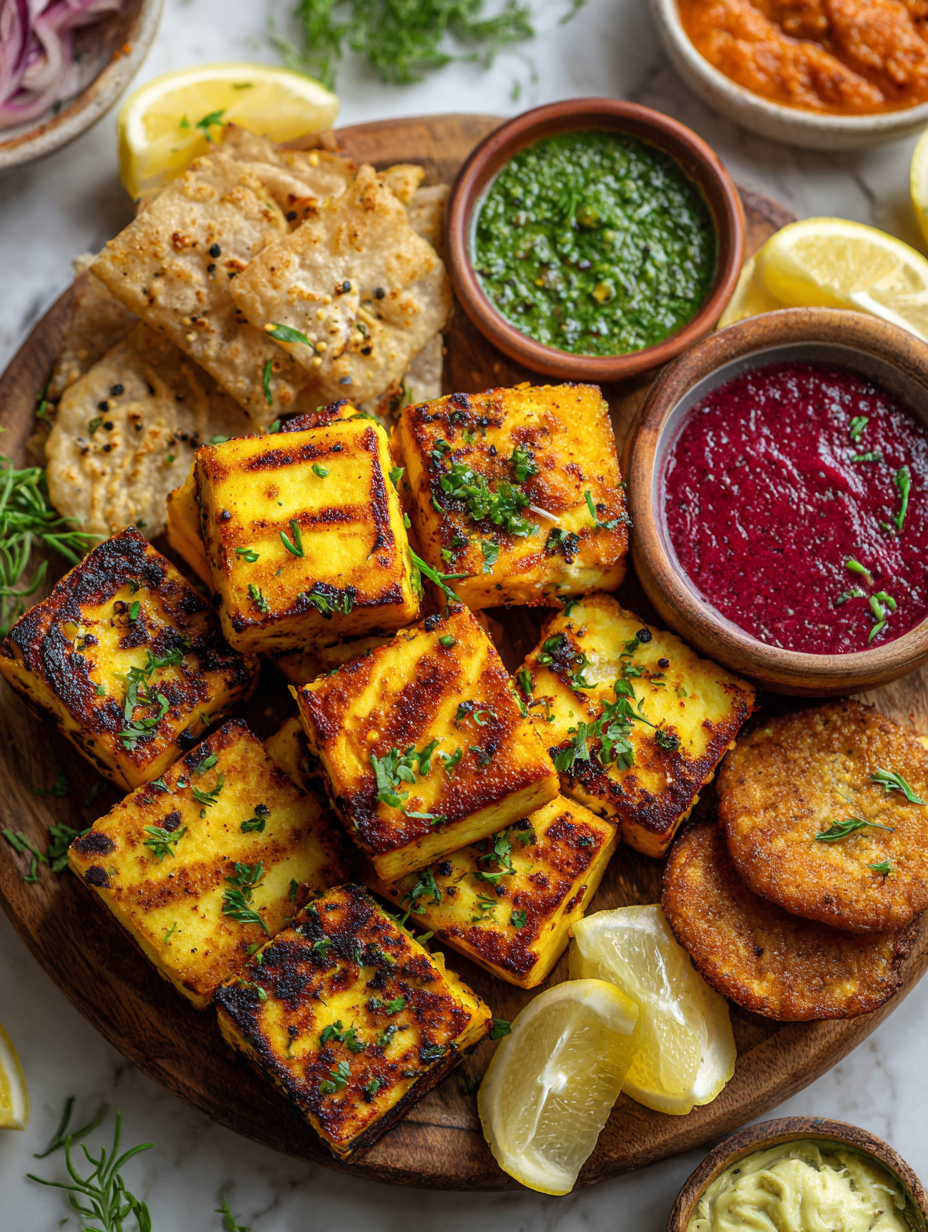
Focusing on the art of assembling a visually appealing yet imperfectly perfect paneer snack plate that celebrates rustic, home-cooked charm over polished presentation.
The story behind this recipe
- This recipe was born out of a lazy Sunday afternoon, when I had some leftover paneer and a sudden craving for something savory and satisfying. I started throwing together bits and bobs from my fridge, and it turned into this charming little platter that feels more like a messy celebration than a perfect presentation. It’s become a kind of food therapy for me, a way to make something beautiful out of everyday ingredients.
- I love how this snack plate invites improvisation—swap in your favorite pickles, herbs, or nuts. It’s a reminder that good food doesn’t need to be complicated or pristine, just honest and a little playful. Every time I make it, it feels like a small act of rebellion against the obsession with perfection in the kitchen.
- heading: “The story behind this recipe”
Ingredient breakdown
- Paneer: I prefer fresh, squeaky paneer that has a mild milky aroma—its texture should be firm yet tender. Swap with firm tofu if you want a vegan option, but you’ll miss that rich, milky bite.
- Spices (turmeric, chili powder): I love a vibrant, smoky flavor that hits the nose first—don’t skimp on the paprika or smoked chili for depth. Adjust the heat to your taste, but remember, the spice should awaken, not overpower.
- Fresh herbs (cilantro, mint): Their bright, herbal aroma really lifts the plate. If you’re out, basil or parsley can work, but the signature freshness will be a bit different—less zing, more earthiness.
- Pickles: I use tangy, crunchy Indian mango or lemon pickles—think fiery, sweet, and sour all at once. If you don’t have pickles, a squeeze of lemon and a dash of chaat masala can mimic that bright tang.
- Nuts (cashews, almonds): Toasted nuts add crunch and warmth—look for that golden hue and aromatic scent. If nuts aren’t your thing, roasted chickpeas or crispy lentils give a similar satisfying texture.
- Chaat masala: This spice blend is my secret weapon—its tangy, salty punch makes everything pop. If unavailable, a quick sprinkle of lemon zest and black salt can mimic its lively zing.
- Olive oil or ghee: I drizzle a little warm ghee for richness and aroma—look for a golden shimmer. For a lighter touch, good-quality olive oil works, but it won’t have that same nutty depth.
Spotlight on key ingredients
Paneer:
- I prefer fresh, squeaky paneer that has a mild milky aroma—its texture should be firm yet tender. Swap with firm tofu if you want a vegan option, but you’ll miss that rich, milky bite.
- Spices (turmeric, chili powder): I love a vibrant, smoky flavor that hits the nose first—don’t skimp on the paprika or smoked chili for depth. Adjust the heat to your taste, but remember, the spice should awaken, not overpower.
Herbs & Pickles:
- Fresh herbs (cilantro, mint): Their bright, herbal aroma really lifts the plate. If you’re out, basil or parsley can work, but the signature freshness will be a bit different—less zing, more earthiness.
- Pickles: I use tangy, crunchy Indian mango or lemon pickles—think fiery, sweet, and sour all at once. If you don’t have pickles, a squeeze of lemon and a dash of chaat masala can mimic that bright tang.
Notes for ingredient swaps
- Dairy-Free: Swap paneer with firm tofu—less milky, more neutral flavor, but keeps that satisfying bite.
- Vegan: Use coconut yogurt or cashew cheese instead of paneer for creaminess without dairy.
- Spice Level: If you prefer milder, reduce chili powder or use smoked paprika for smoky depth without heat.
- Herbs: No cilantro? Swap with basil or parsley—less zing, but still fresh and aromatic.
- Nuts: Almonds or walnuts work well if you don’t have cashews—still add crunch, just a different flavor profile.
- Pickles: Substitute with lemon wedges or a quick squeeze of lemon and a pinch of chaat masala for tangy brightness.
- Oil: For a lighter option, drizzle with a neutral vegetable oil or skip entirely—won’t have that rich aroma, but still good.
Equipment & Tools
- Non-stick skillet: For even, quick browning of paneer
- Spatula: To flip and handle hot paneer gently
- Small bowl: To prepare herbs and pickles before assembling
- Serving platter: To assemble and present the snack plate
Step-by-step guide to paneer snack plate
- Gather your equipment: a non-stick skillet, a spatula, a small bowl, and a serving platter. The skillet is for quick, even cooking; spatula for gentle handling; bowl for prepping ingredients; platter for assembling.
- Cut the paneer into 1-inch cubes. Pat dry with a paper towel to remove excess moisture, which helps in getting a better sear.
- Heat the skillet over medium heat to about 180°C (350°F). Add a tablespoon of ghee or oil, enough to coat the bottom.
- Once hot and shimmering, add the paneer cubes in a single layer. Cook for 3–4 minutes until edges turn golden and crispy. Flip carefully with the spatula and cook another 2–3 minutes. If sticking, gently loosen with the spatula.
- While paneer cooks, prepare the herbs and pickles. Chop cilantro and mint finely, and set aside. Slice pickles into small, tangy pieces.
- Remove the paneer from skillet and let drain on paper towels for a minute. It should be crispy on the outside but still tender inside.
- Arrange the paneer on the serving platter. Scatter chopped herbs, pickles, toasted nuts, and a sprinkle of chaat masala over the top.
- Finish with a drizzle of warm ghee or olive oil for aroma and shine. Let rest for 2 minutes before serving to meld flavors.
Let the assembled plate sit for 2 minutes to allow flavors to meld. Drizzle with a bit more ghee or olive oil just before serving for extra aroma and shine. Serve in small portions, encouraging a mix of textures and flavors with each bite.
How to Know It’s Done
- Paneer edges are golden and crispy, not pale or soggy.
- Aromatic smell of spices and herbs fills the air during cooking.
- Ghee or oil has a shimmering, golden hue on the paneer surface.
Rustic Paneer Snack Plate
Ingredients
Equipment
Method
- Cut the paneer into 1-inch cubes and pat them dry to remove excess moisture, helping them sear better.
- Heat a non-stick skillet over medium heat and add a tablespoon of oil or ghee until shimmering and fragrant.
- Add the paneer cubes to the hot skillet in a single layer. Sear for 3-4 minutes on each side, until golden and crispy on the edges, with a gentle sizzling sound.
- Carefully flip the paneer cubes with a spatula to brown all sides evenly, ensuring they become crispy and aromatic.
- While the paneer cooks, chop the fresh cilantro and mint finely, and set aside in a small bowl. Also, chop the pickles into small, tangy pieces.
- Once the paneer is golden and crispy, transfer it onto a paper towel-lined plate to drain excess oil.
- Arrange the cooked paneer on your serving platter in a rustic, imperfect pile. Scatter the chopped herbs and pickles over the top, along with toasted nuts.
- Sprinkle a teaspoon of chaat masala over the top for a tangy, salty punch. Finish by drizzling a little warm ghee or olive oil for aroma and shine.
- Allow the platter to sit for a minute so flavors meld and the herbs stay vibrant. Serve immediately with a side of extra pickles or fresh bread if desired.
Notes
Tips for perfect paneer snack plate
- Bolded mini-head: Use a hot pan → Ensures a crispy, golden crust on the paneer without sticking.
- Bolded mini-head: Don’t overcrowd the pan → Cook in batches if needed to keep the heat high and paneer crispy.
- Bolded mini-head: Add spices at the right moment → Toast spices in oil just until fragrant to unlock their full aroma.
- Bolded mini-head: Gently flip the paneer → Use a spatula to avoid breaking the cubes and get even browning.
- Bolded mini-head: Rest before serving → Let cooked paneer sit for a minute to keep juices in and avoid sogginess.
- Bolded mini-head: Drizzle warm ghee at the end → Adds aroma and shine, making the dish feel richer and more inviting.
- Bolded mini-head: Taste and adjust seasoning → Before assembling, check for balance—more salt or spice might be needed.
Common mistakes and how to fix them
- FORGOT to preheat the skillet → Always warm the pan before adding paneer.
- DUMPED the spices directly into hot oil → Toast spices gently to release aroma and prevent burning.
- OVER-TORCHED the paneer → Cook on medium heat; golden edges, not burnt, for perfect texture.
- MISSED resting time → Rest cooked paneer for a minute to lock in juices and prevent breakage.
Quick fixes and pantry swaps
- When oil shimmers, add paneer quickly to avoid sticking and sogginess.
- Splash a little water if spices burn too fast, calming the heat and aroma.
- Patch burnt spices with a squeeze of lemon to refresh the dish’s brightness.
- Shield delicate herbs from direct heat by adding just before serving for maximum freshness.
- If paneer is too soft, rescue with a quick sear in a hot, oiled pan for crunch.
Prep, store, and reheat tips
- Prepare the herbs and chop pickles a day in advance; store in an airtight container in the fridge. They stay vibrant for up to 2 days and keep the plate lively.
- Cook the paneer and let it cool completely; store in a sealed container for up to 24 hours. Reheat gently in a skillet over low heat to restore some crispness, noting the texture may soften slightly.
- Assemble the platter shortly before serving to keep the herbs fresh and nuts crunchy. If making ahead, keep components separate to prevent sogginess.
- If leftovers are stored together, consume within 1-2 days. The flavors mellow and herbs may wilt, but the dish remains tasty—just give it a quick reheat and fresh herbs before serving.
- Reheating: Gently warm the paneer in a skillet or microwave. Watch for overcooking; paneer can become rubbery if heated too long. Add a splash of oil or ghee for aroma once heated.
Top questions about paneer snack plate
1. How do I choose the right paneer?
Use fresh, squeaky paneer for the best texture and milky flavor. It should be firm yet tender, almost bouncy when you bite into it.
2. How long should I cook the paneer?
Cook the paneer over medium heat until the edges turn a deep golden and develop a slight crispness, about 3-4 minutes per side.
3. When do I add the spices?
Add spices like turmeric and chili powder early in the pan to toast them lightly, releasing their aroma without burning.
4. Should I add herbs before or after cooking?
Garnish with fresh herbs right before serving to keep their bright flavor and avoid wilting or sogginess.
5. How hot should the pan be?
Use a hot, shimmering skillet to ensure the paneer gets a crispy, golden crust without sticking or breaking apart.
6. Can I make this ahead?
Store leftovers in an airtight container in the fridge for up to a day. Reheat gently in a skillet to revive some crispness.
7. My paneer is sticking—what do I do?
If the paneer sticks to the pan, loosen gently with a spatula and add a little more oil or ghee to prevent sticking.
8. How can I make it milder?
Adjust the spice level by reducing chili powder or using smoked paprika for a milder, smoky flavor without heat.
9. How do I toast the nuts properly?
For extra crunch, toast your nuts until golden and fragrant—this enhances their flavor and adds satisfying texture.
10. Should I add oil or ghee at the end?
Finish with a drizzle of warm ghee or good-quality olive oil to add aroma, shine, and richness to the platter.
This paneer snack plate is my go-to when I want something quick but with a bit of that rustic charm. It’s imperfect and easy, but every bite feels like a little celebration of simple ingredients. Right now, with the season’s fresh herbs and the lingering smell of spices, it feels just right for a casual, cozy moment.
Cooking it always reminds me that sometimes the best dishes come from a handful of leftovers and a little improvisation. It’s honest, unpolished, and perfectly imperfect—like the kind of food that makes you smile without trying too hard.

Hi, I’m Daniel Whitaker, the voice and recipe developer behind Broth Psychologist. I’m so glad you’re here. This little corner of the internet started as a way for me to share comfort through cooking, but it has grown into something much deeper.
 Hi, I’m Daniel Whitaker, the voice and recipe developer behind Broth Psychologist. I’m so glad you’re here.
This little corner of the internet started as a way for me to share comfort through cooking, but it has grown into something much deeper.
It’s where food meets feeling, and where simple ingredients tell meaningful stories.
Hi, I’m Daniel Whitaker, the voice and recipe developer behind Broth Psychologist. I’m so glad you’re here.
This little corner of the internet started as a way for me to share comfort through cooking, but it has grown into something much deeper.
It’s where food meets feeling, and where simple ingredients tell meaningful stories.


