This yogurt snack jar isn’t just a quick bite; it’s a tiny ritual I create to start my day with intention. The layering of creamy yogurt, crunchy nuts, and sweet fruit feels like a small celebration in a jar, something I look forward to assembling and savoring. It’s a way to make a mundane snack feel special, even in a rush.
I love how adaptable it is—filling it with whatever’s in the fridge or pantry, making it as indulgent or as light as I need. It’s perfect for grabbing on busy mornings or packing for a midday pick-me-up. Honestly, this little jar has become my go-to for turning a simple snack into a moment of mindful enjoyment.
Focusing on the art of packing a nutritious snack into a jar that feels like a small ritual—something you look forward to, not just a hurried bite. This isn’t just about yogurt; it’s about creating a layered experience you can assemble in minutes but savor throughout the day.
The story behind this recipe
- This recipe actually started from a lazy Sunday morning where I had a few leftover ingredients and no plan. I threw everything into a jar almost as an experiment, and surprisingly, it became my favorite quick breakfast. It was a reminder that sometimes, randomness in the kitchen leads to the best discoveries.
- Over time, I realized that layering textures and flavors in a jar made each bite more interesting—crunchy, creamy, sweet, and tangy all at once. It’s a small act of creativity that turns a simple snack into a little moment of joy, especially when I need a quick boost during hectic days.
- heading: The spark that made me start
Ingredient breakdown: key components
- Greek yogurt: I love the tangy creaminess it adds, and I prefer full-fat for richness. You can swap in coconut yogurt for a dairy-free twist, though it’ll be less tangy.
- Honey: A drizzle brings a gentle sweetness that balances the tart yogurt. If you want less sugar, start with half the amount and adjust to taste.
- Fresh berries: I use blueberries and raspberries for vibrant color and juiciness. Frozen berries work well too—just thaw and drain excess moisture to prevent sogginess.
- Nuts: Chopped almonds or walnuts give a satisfying crunch. Toast them lightly first for extra aroma and flavor, but skip if you prefer a softer texture.
- Granola: Adds a crisp, caramelized layer. Be mindful of the sugar content—look for low-sugar or homemade versions if you want to keep it lighter.
- Chia seeds: I love how they swell and add a little gel-like texture. They’re optional but boost fiber and omega-3s; soak them in a tiny bit of water beforehand for easier mixing.
- Lemon zest: Brightens everything with a zingy aroma. Use sparingly so it doesn’t overpower the other delicate flavors, and prefer fresh zest over bottled for vibrancy.
Spotlight on key ingredients
Greek yogurt:
- I love the tangy creaminess it adds, and I prefer full-fat for richness. You can swap in coconut yogurt for a dairy-free twist, though it’ll be less tangy.
- Honey: A drizzle brings a gentle sweetness that balances the tart yogurt. If you want less sugar, start with half the amount and adjust to taste.
- Fresh berries: I use blueberries and raspberries for vibrant color and juiciness. Frozen berries work well too—just thaw and drain excess moisture to prevent sogginess.
Lemon zest:
- Chia seeds: I love how they swell and add a little gel-like texture. They’re optional but boost fiber and omega-3s; soak them in a tiny bit of water beforehand for easier mixing.
- Brightens everything with a zingy aroma. Use sparingly so it doesn’t overpower the other delicate flavors, and prefer fresh zest over bottled for vibrancy.
Notes for ingredient swaps
- Dairy-Free: Swap Greek yogurt for coconut or almond yogurt. It’ll be less tangy, with a creamier, plant-based richness.
- Sweetener: Use maple syrup or agave instead of honey. They add a different, more complex sweetness but still blend well.
- Fruits: Swap berries for sliced peaches, mango, or kiwi. You’ll get a different juiciness and vibrant color.
- Nuts: Almonds or pistachios work nicely as alternatives. Toast them lightly for extra aroma, or skip for allergy concerns.
- Granola: Try toasted oats or seed-based granola for crunch without extra sugar. Adjust based on your preferred texture.
- Seeds: Flaxseeds or sunflower seeds can replace chia. They add crunch and nutrition, but don’t swell like chia.
- Lemon Zest: Lime or orange zest can be used for a different citrus zing, bringing a fresh, bright note.
Equipment & Tools
- Spoon: For layering and spreading ingredients smoothly.
- Measuring spoons: To portion honey, nuts, and granola accurately.
- Small jar or container: To assemble and store your snack.
- Zester or grater: To add fresh lemon zest for brightness.
Guide to Assembling Your Yogurt Jar
- Gather all your ingredients: Greek yogurt, honey, mixed berries, chopped nuts, granola, chia seeds, and lemon zest. Prepare a clean, clear workspace with your jars ready.
- Start with a clean 250ml (1 cup) jar or small glass container. Make sure it has a lid for easy transport or storage.
- Spoon about 3 tablespoons of Greek yogurt into the bottom of the jar. Smooth it out with the back of the spoon, making a flat layer.
- Drizzle a small teaspoon of honey over the yogurt. This adds a gentle sweetness and helps layer flavor.
- Add a handful of berries—about 5-6 berries per jar. Distribute evenly for bursts of juice in every bite.
- Sprinkle a tablespoon of chopped nuts on top of the berries. If toasted, they’ll release a warm, nutty aroma.
- Next, add a layer of granola—about 2 tablespoons. It should be crunchy and slightly caramelized, adding texture.
- Sprinkle a pinch of chia seeds over the granola for a gel-like texture and extra fiber.
- Finish with a final layer of yogurt—another 3 tablespoons. Smooth out the top, then garnish with a little lemon zest for brightness.
- Seal the jar with the lid. Give it a gentle shake if desired to mix flavors slightly or leave it layered for visual appeal.
- Let the jar rest in the fridge for at least 30 minutes before eating. This allows flavors to meld and chia seeds to hydrate.
- When ready to enjoy, open the jar and admire the colorful layers. The aroma of berries, nuts, and lemon zest should be inviting.
Seal the jar tightly and refrigerate for at least 30 minutes. When ready, remove from fridge, give a gentle shake if you like, or just dig in with a spoon. The layered look makes it feel like a little treat before even tasting.
How to Know It’s Done
- Yogurt layer is smooth and slightly firm, not runny.
- Berries are vibrant and juicy, not mushy or over-soft.
- Granola remains crisp, with no soggy patches or excessive moisture.
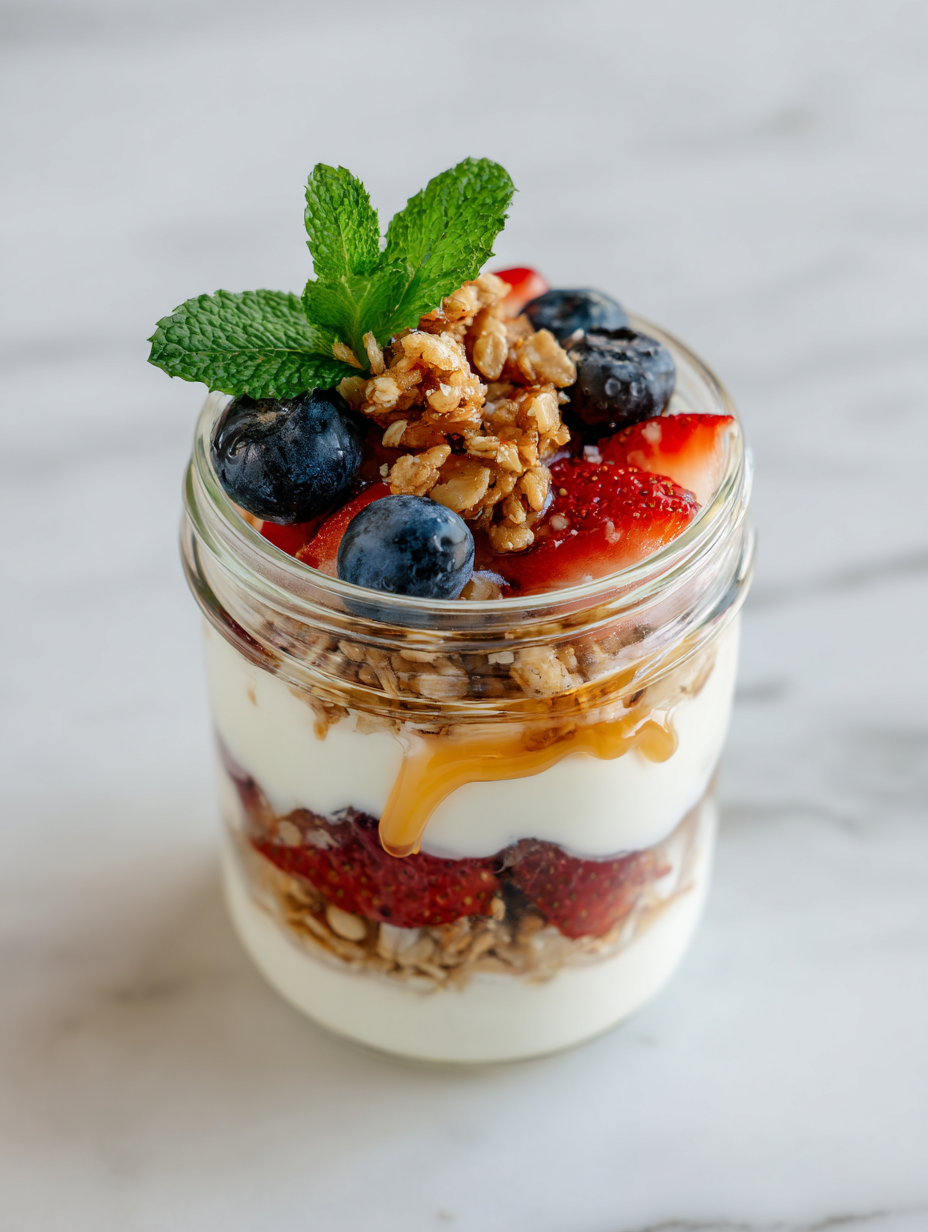
Layered Yogurt Snack Jar
Ingredients
Equipment
Method
- Begin by placing your small jar or container on your workspace. Spoon 3 tablespoons of Greek yogurt into the bottom, smoothing it gently with the back of your spoon until it forms a flat, even layer.
- Drizzle about a teaspoon of honey over the yogurt layer. This adds a touch of sweetness and helps blend the flavors as you layer.
- Distribute 5-6 vibrant berries evenly over the honey-topped yogurt, pressing them slightly so they stay in place and release their juices for a burst of color and flavor.
- Sprinkle a tablespoon of toasted chopped nuts over the berries, adding a satisfying crunch and nutty aroma to each bite.
- Next, layer two tablespoons of crunchy granola over the nuts, ensuring it stays crisp and adds texture to the mixture.
- Sprinkle a teaspoon of soaked chia seeds over the granola for extra fiber and a gel-like texture, or skip if you prefer.
- Finish by spooning another 3 tablespoons of Greek yogurt on top, smoothing the surface gently. Grate a small amount of fresh lemon zest over the top to add brightness and aroma.
- Seal the jar tightly with the lid and refrigerate for at least 30 minutes to allow flavors to meld and the chia seeds to hydrate. When ready to serve, enjoy the colorful layers with a spoon, savoring the textures and fresh flavors.
Pro tips for perfect yogurt jars
- layering: Press ingredients gently to ensure each layer is distinct and visually appealing.
- chill: Chill the jar in the fridge for at least 30 minutes to meld flavors and hydrate chia seeds.
- balance: Add honey gradually, tasting as you go to avoid overly sweet layers.
- toast: Lightly toast nuts first to release aroma and deepen flavor, enhancing crunch and richness.
- zest: Use fresh lemon zest for a bright, aromatic burst that elevates the whole jar.
- adjust: If berries release too much juice, drain slightly to keep layers intact and prevent sogginess.
- serve: For added contrast, sprinkle a few extra nuts or zest just before serving for fresh bursts.
Common mistakes and how to fix them
- FORGOT to preheat oven → Always heat oven to 180°C (350°F) before baking.
- DUMPED too much sugar → Use half the sugar, then adjust to taste after tasting the batter.
- OVER-TORCHED the crust → Keep a close eye and remove from heat when golden, around 10 minutes.
- MISSED stirring ingredients → Mix thoroughly to prevent uneven baking or flavor pockets.
Quick fixes and pantry swaps
- When in doubt, splash a little lemon juice to brighten flavors immediately.
- If berries are too juicy, drain excess liquid to keep layers distinct.
- Patch soggy granola by adding a fresh sprinkle just before serving for crunch.
- Shield yogurt from over-mixing by gently stirring to avoid breaking the texture.
- Rescue a runny jar by adding more nuts or granola for texture and absorption.
Prep, store, and reheat tips
- Prep fruit and nuts ahead: chop berries and nuts the night before for quick assembly and added crunch.
- Store assembled jars in the fridge for up to 24 hours; flavors meld and yogurt stays fresh, but enjoy sooner for best texture.
- If storing longer than a day, keep toppings separate and add just before eating to maintain crunch and vibrancy.
- Reheat gently: if you prefer slightly warmer yogurt, warm in a water bath for a few seconds or leave at room temperature for 10 minutes. The aroma of warmed berries and toasted nuts will emerge.
- Notice the yogurt thickening and berries softening over time—this is normal; if it gets too watery, drain excess moisture before serving.
Top Questions About Yogurt Snack Jars
1. Can I use dairy-free yogurt?
Use full-fat Greek yogurt for creaminess, but coconut yogurt works if you’re dairy-free. It’s less tangy but still satisfies that smooth texture.
2. What if I don’t have honey?
Yes, you can swap honey with maple syrup or agave nectar. They add a different sweetness but blend nicely.
3. Can I use frozen berries?
Frozen berries are fine; just thaw and drain excess moisture so they don’t make the jar soggy.
4. Are chia seeds necessary?
Chia seeds swell and create a gel-like texture, adding fiber. Soak them in a little water before layering if you want easier mixing.
5. Can I use different nuts?
Use raw or toasted nuts—toast first for extra aroma and crunch. Chopped almonds or walnuts are my go-to.
6. How far ahead can I prep?
Prepare and chop your fruit and nuts ahead of time. Store in the fridge for up to a day before layering.
7. How long does it last?
Seal the jar tightly and refrigerate at least 30 minutes to let flavors meld. Enjoy within 24 hours for best texture.
8. Can I reheat my snack jar?
To reheat, leave the jar at room temperature for 10 minutes or warm gently in a water bath for a few seconds.
9. How do I fix soggy granola?
If the granola gets soggy, sprinkle fresh on top just before eating for added crunch.
10. Is fresh lemon zest necessary?
Use fresh lemon zest for brightness. Bottled zest is less vibrant and won’t give the same zing.
This yogurt snack jar isn’t just about quick nourishment; it’s about creating a mindful pause in a busy day. Each layer, from tangy yogurt to crunchy nuts, sparks a small moment of joy, especially when you take the time to assemble it thoughtfully.
In a world that moves fast, this jar offers a simple pleasure—something you can look forward to, whether for breakfast, a mid-afternoon boost, or a late-night treat. It’s surprisingly versatile and makes even the simplest ingredients feel a little more special.

Hi, I’m Daniel Whitaker, the voice and recipe developer behind Broth Psychologist. I’m so glad you’re here. This little corner of the internet started as a way for me to share comfort through cooking, but it has grown into something much deeper.
 Hi, I’m Daniel Whitaker, the voice and recipe developer behind Broth Psychologist. I’m so glad you’re here.
This little corner of the internet started as a way for me to share comfort through cooking, but it has grown into something much deeper.
It’s where food meets feeling, and where simple ingredients tell meaningful stories.
Hi, I’m Daniel Whitaker, the voice and recipe developer behind Broth Psychologist. I’m so glad you’re here.
This little corner of the internet started as a way for me to share comfort through cooking, but it has grown into something much deeper.
It’s where food meets feeling, and where simple ingredients tell meaningful stories.


