When I first started paying attention to my pan’s surface texture and temperature, everything changed. It’s not just about seasoning or timing, but about that critical moment when the pan hits the perfect heat—crisp skin, tender flesh, no sticking. It feels like an art I’m still learning, but the payoff is worth it every single time.
This recipe isn’t about quick fixes or shortcuts. It’s about giving the salmon the respect of a hot pan, a little patience, and a gentle touch. That’s how you get a beautifully seared skin that crackles with each bite, while the flesh stays moist and flaky. It’s simple, honest, and doesn’t hide behind fancy ingredients—just good technique.
Focusing on the overlooked importance of the pan’s temperature and surface texture to achieve perfectly crisp skin and tender flesh, rather than just timing or seasoning.
The unseen science behind perfect sear
- Finding that perfect pan temperature took me ages, but now I can tell by the sizzle when it’s just right.
- There’s a quiet thrill in hearing that crisp skin crackle under the spatula—it’s like a small victory every time.
- I used to overcook salmon out of fear, but learning to trust my senses transformed how tender and juicy it is.
- This dish reminds me of summer evenings—simple, fresh, and honestly satisfying without fuss.
The unseen science behind perfect sear
- I remember the first time I nailed that perfect sear on salmon, and how the skin crackled like crispy bacon. It felt like I unlocked a secret in my kitchen, something that took patience and attention to heat, not just seasoning. From then on, I started paying closer attention to every sizzle and shimmer of the pan, realizing that’s where real magic happens.
- This dish isn’t just about cooking fish; it’s about tuning into those small signals—the smell of caramelizing fat, the color deepening—that tell you it’s time to flip or rest. It’s a moment of quiet confidence, a reminder that good technique can turn a simple piece of fish into something memorable, without fuss or fancy tricks.
- heading: “The unseen science behind perfect sear”
Historical and Culinary Trivia
- Pan-searing salmon became popular in the early 20th century as home cooks sought restaurant-quality dishes with simple tools.
- The technique of SEARING fish like salmon was historically used by fishermen to quickly preserve freshness and develop flavor.
- Traditional Japanese cuisine, like tempura, influenced Western pan-searing methods by emphasizing quick, high-heat cooking to lock in moisture.
- The crispy skin on salmon served as a way to add texture and flavor, making it a prized feature in many culinary traditions worldwide.
- Modern food scientists discovered that optimal searing occurs around 180°C (355°F), balancing caramelization and avoiding sticking or burning.
Ingredient breakdown
- Salmon fillet: I look for bright, firm flesh—if it’s dull or soft, it won’t sear well. Swap with trout if you want a milder flavor, but still aim for freshness.
- Salt: I prefer sea salt for a clean, briny kick—just a pinch enhances the skin’s crispness. Use less if you’re watching sodium, but skip the flavor boost.
- Oil: I use a neutral oil with a high smoke point—like grapeseed or canola—to prevent burning. Try butter for richer flavor—just add it later to avoid smoking.
- Lemon: I squeeze fresh lemon just before serving—brightens the richness of the salmon. Swap with lime for a different citrus zing, or skip if you prefer a pure fish flavor.
- Herbs (optional): I love a sprinkle of thyme or dill—fresh herbs add a fragrant touch. Dried herbs work too, but use less since they’re more concentrated.
- Pepper: I grind black pepper fresh over the skin for a subtle spice—if you prefer chili flakes, they add a smoky heat instead. Skip if you want a cleaner taste.
Spotlight on key ingredients
Salmon fillet:
- I look for bright, firm flesh—if it’s dull or soft, it won’t sear well. Swap with trout if you want a milder flavor, but still aim for freshness.
- Salt: I prefer sea salt for a clean, briny kick—just a pinch enhances the skin’s crispness. Use less if you’re watching sodium, but skip the flavor boost.
- Oil: I use a neutral oil with a high smoke point—like grapeseed or canola—to prevent burning. Try butter for richer flavor—just add it later to avoid smoking.
Lemon and herbs:
- Lemon: I squeeze fresh lemon just before serving—brightens the richness of the salmon. Swap with lime for a different citrus zing, or skip if you prefer a pure fish flavor.
- Herbs (optional): I love a sprinkle of thyme or dill—fresh herbs add a fragrant touch. Dried herbs work too, but use less since they’re more concentrated.
Notes for ingredient swaps
- Seafood Swap: Trout or Arctic char can replace salmon with a milder, less oily profile, but still sear beautifully.
- Oil Choice: Grape seed or canola oil work well for high heat; butter adds richness but risks smoking—try clarified butter for less smoke.
- Salt: Kosher or flaky sea salt enhances skin crispness; table salt is fine, just use less to avoid oversalting.
- Citrus: Lemon is classic, but lime or orange zest can brighten the dish with a different, vibrant note.
- Herbs: Fresh dill or thyme add a fragrant touch—dried herbs work in a pinch but won’t release as much aroma.
- Pepper: Freshly ground black pepper delivers a subtle spice—chili flakes give a smoky heat, if you like a kick.
Equipment & Tools
- Heavy skillet (cast iron or non-stick): Provides even heat and a good sear surface.
- Tongs or spatula: Gently flip and handle the fish without breaking the flesh.
- Paper towels: Pat the fillet dry for crisp skin.
- Small bowl: Hold oil for easy pouring and control.
- Sharp knife: For trimming and portioning if needed.
Step-by-step guide to pan searing
- Equipment & Tools: Gather a heavy, non-stick or cast-iron skillet; tongs or a spatula; a paper towel; a small bowl for oil; a sharp knife; a plate for resting.
- Prepare the salmon: Pat the fillet dry with paper towels, especially the skin. Season generously with sea salt and a little pepper on both sides.
- Heat the pan: Place it over medium-high heat (~200°C / 390°F). Let it heat up until you see a slight shimmer, and the surface is hot to touch but not smoking.
- Add oil: Pour a thin layer of high-smoke point oil into the pan. Swirl to coat evenly. Look for a gentle shimmer—this is your cue.
- Place the salmon skin-side down: Gently lay the fillet away from you to avoid splatters. Use tongs or spatula to press down lightly for the first 15 seconds, ensuring the skin makes good contact.
- Cook without moving: Let it sear for 4-6 minutes (depending on thickness). The skin should turn golden brown and become crispy. You’ll see the sides start to turn opaque.
- Flip the fillet: Carefully slide a spatula or tongs underneath and flip. Cook for another 2-4 minutes, until the flesh is just opaque and flakes easily. If the skin sticks, give it another minute—resist the urge to force it.
- Check doneness: The flesh should be tender and slightly opaque in the center, with a crackling skin. Use a probe thermometer if needed—aim for 50-52°C (122-125°F).
- Rest the salmon: Transfer to a plate, tent loosely with foil, and let rest for 2 minutes. This helps reabsorb juices and finish cooking gently.
- Finish & serve: Squeeze fresh lemon over, sprinkle with herbs if desired, and serve immediately for best crispness and tenderness.
Transfer the salmon to a plate, tent loosely with foil, and rest for 2 minutes. Finish with a squeeze of lemon and a sprinkle of herbs before serving.
How to Know It’s Done
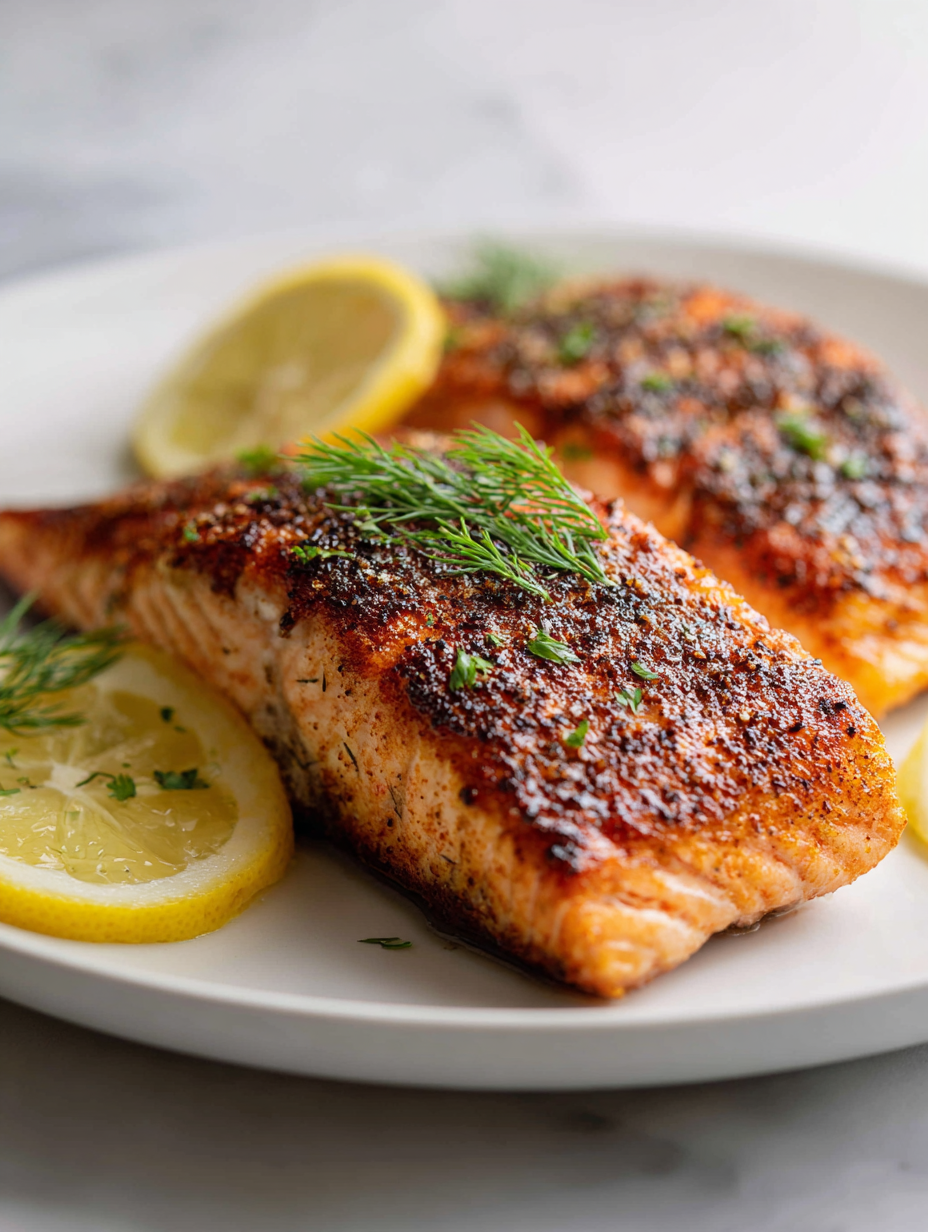
- Crispy, golden skin with a crackle when pressed.
- Flesh flakes easily with a gentle fork twist, just opaque in the center.
- Probe temperature around 50-52°C (122-125°F) for perfect doneness.
Perfect Pan-Seared Salmon
Ingredients
Equipment
Method
- Pat the salmon fillets dry thoroughly with paper towels, especially the skin, to ensure crispness.
- Season the fillets generously on both sides with sea salt and freshly ground black pepper, pressing gently to help the seasoning adhere.
- Heat your heavy skillet over medium-high heat until it’s hot and shimmering—look for a slight shimmer on the surface, indicating readiness.
- Add a tablespoon of neutral oil to the pan, swirling to coat evenly. Wait until the oil shimmers gently, signaling it's hot enough for searing.
- Gently lay the salmon fillet skin-side down into the pan, away from you to avoid splatters, and press lightly with a spatula for about 15 seconds to ensure full contact.
- Let the salmon sear without moving it for 4 to 6 minutes, watching as the skin turns a deep golden brown and becomes crispy, while the sides start to turn opaque.
- Carefully flip the fillet using tongs or a spatula, then cook for another 2 to 4 minutes until the flesh is just opaque and flakes easily with a fork.
- Remove the salmon from the pan and transfer to a plate, tent loosely with foil, and let rest for 2 minutes to allow juices to settle.
- Squeeze fresh lemon over the fillet, sprinkle with herbs if using, and serve immediately for maximum crispness and moist, flaky flesh.
Notes
Pro tips for perfect searing
- Bolded mini-head: Hot pan → Ensure your pan is truly hot before adding oil—shimmering surface is key.
- Bolded mini-head: Skin contact → Gently press the salmon down for the first 15 seconds to prevent curling and sticking.
- Bolded mini-head: Oil shimmer → Look for a light shimmer to know it’s ready—too early or late can affect crispness.
- Bolded mini-head: Flip timing → Flip only when the skin is deeply golden and releases easily—resist the urge to move too soon.
- Bolded mini-head: Rest period → Rest the cooked salmon for 2 minutes to allow juices to settle for maximum tenderness.
- Bolded mini-head: Finishing touch → Squeeze lemon immediately after resting to brighten flavors and balance richness.
- Bolded mini-head: Reverse sear → For thicker cuts, finish in the oven at 180°C (355°F) after searing for even doneness.
Common mistakes and how to fix them
- FORGOT to preheat the pan → Always heat the pan until shimmering before adding oil.
- DUMPED too much oil in the pan → Use just enough oil to coat the surface, avoid puddles.
- OVER-TORCHED the salmon → Keep an eye on heat; lower if smoke appears, and flip sooner.
- SKIPPED resting time → Rest the fish for a couple of minutes to reabsorb juices and finish cooking.
Quick fixes and pantry swaps
- If salmon sticks, splash a little water to cool the pan and loosen the skin.
- When skin isn’t crisp enough, increase heat slightly and cook longer, watching for color.
- Dumped too much oil? Patch with a paper towel to absorb excess and prevent splatters.
- Overcooked the fish? Rest in foil for a minute and gently reheat with a damp towel on top.
- When flavor is bland, swap lemon for a splash of lime or a dash of vinegar for brightness.
Prep, store, and reheat tips
- Prep the salmon: Pat it dry and season with salt a day before. Keeps the skin crispy and flavors concentrated.
- Store in an airtight container in the fridge for up to 24 hours. The flesh stays tender, but avoid overly cold storage that can dry it out.
- Reheat gently: Warm in a low oven at 120°C (250°F) for about 10 minutes. Expect a mellow aroma and tender texture, not the crispness of fresh sear.
- Salmon can be frozen for up to 2 months if wrapped tightly in plastic and foil. Thaw overnight in the fridge before reheating.
- Flavor impact: Reheated salmon loses some of its fresh brightness but remains rich and flaky. Best enjoyed soon after cooking for that crispy skin experience.
Top questions about pan seared salmon
1. How hot should the pan be?
Use a hot, well-seasoned pan to get that crisp skin. If the pan isn’t hot enough, the salmon will stick and won’t sear properly.
2. How do I know when the salmon is cooked?
Look for a deep golden-brown color on the skin, and ensure the flesh flakes easily with a fork.
3. How long do I sear each side?
Cook the fillet skin-side down first, for about 4-6 minutes, then flip carefully and cook just a bit more.
4. Should I rest the salmon after cooking?
Rest the salmon for 2 minutes after cooking, uncovered, to allow juices to redistribute and keep it tender.
5. What oil should I use?
Use a high-smoke-point oil like grapeseed or canola. Butter adds richness but risks burning if the heat is too high.
6. What if the skin isn’t crispy?
If the skin isn’t crisp enough, turn up the heat slightly and give it a minute longer, but watch for burning.
7. When should I add lemon or herbs?
Add a squeeze of lemon or a sprinkle of fresh herbs right after cooking to enhance flavor and brightness.
8. How do I prevent sticking?
To prevent sticking, make sure the pan is hot and the skin is dry before placing the salmon in the pan.
9. How do I flip the salmon without breaking it?
Use a thin, flexible spatula to gently flip the salmon, supporting the flesh to avoid breaking it.
10. How can I tell if it’s done?
The salmon is done when the flesh is opaque in the center and flakes easily with a fork.
This dish isn’t just about achieving that perfect sear; it’s about trusting your senses and paying attention to those small signals in the pan. The aroma, the crackle, the color—all of it comes together to make a simple piece of fish feel special. It’s a straightforward technique, but one that rewards patience and a little bit of practice.
In the end, it’s about savoring that moment when the skin is crisp and golden, and the flesh is tender and flaky. No fancy ingredients needed—just good technique and an honest approach. That’s what makes this recipe a go-to for busy nights or when you want something honest and satisfying.

Hi, I’m Daniel Whitaker, the voice and recipe developer behind Broth Psychologist. I’m so glad you’re here. This little corner of the internet started as a way for me to share comfort through cooking, but it has grown into something much deeper.
 Hi, I’m Daniel Whitaker, the voice and recipe developer behind Broth Psychologist. I’m so glad you’re here.
This little corner of the internet started as a way for me to share comfort through cooking, but it has grown into something much deeper.
It’s where food meets feeling, and where simple ingredients tell meaningful stories.
Hi, I’m Daniel Whitaker, the voice and recipe developer behind Broth Psychologist. I’m so glad you’re here.
This little corner of the internet started as a way for me to share comfort through cooking, but it has grown into something much deeper.
It’s where food meets feeling, and where simple ingredients tell meaningful stories.


