Cooking chicken breast on the grill often feels like walking a tightrope—so easy to end up with dry, flavorless meat. But I’ve found that a simple brine and careful heat management can turn that around completely. It’s about respecting the meat’s delicate nature and giving it the right amount of moisture and heat.
This recipe is a bit of a cheat code for summer grill days when you want something straightforward but still crave that smoky, juicy bite. I like to keep it honest and unpolished—no fancy ingredients, just a good sense of timing, a bit of patience, and a grill that’s ready to give me that perfect sear without overdoing it.
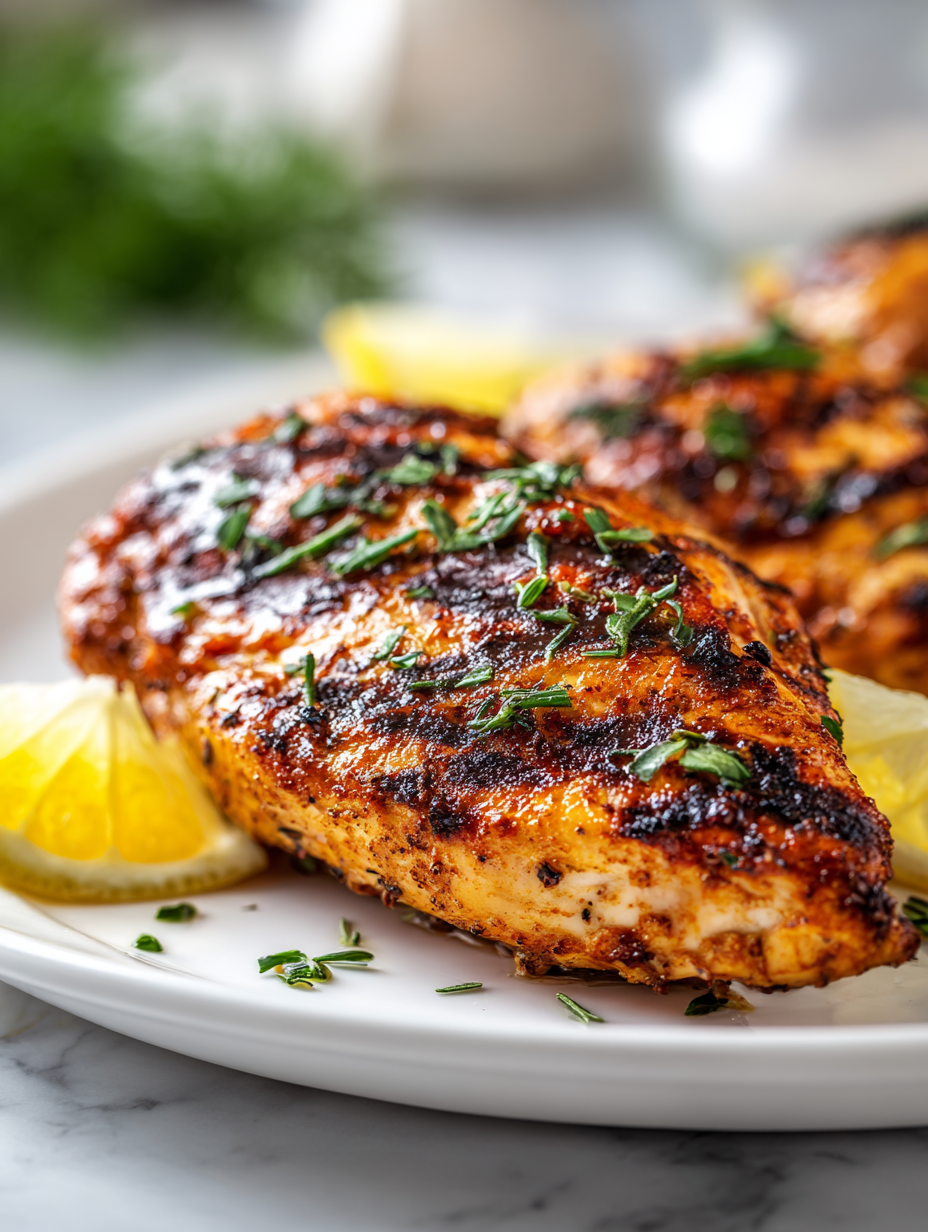
Focusing on how to achieve perfectly tender, juicy chicken breast on the grill, despite common dryness and overcooking pitfalls, by using a simple brine and precise heat control.
A Simple Trick for Juicy Results
- Cooking chicken on the grill used to feel nerve-wracking—until I discovered the magic of a quick brine.
- Getting that perfect char always makes me grin, even if the meat is just a little over the coals.
- There’s a satisfaction in knowing I can turn simple ingredients into something flavorful and honest.
- Every time I nail the timing, I feel a small pride that lasts through the sizzling scent.
- Sometimes, it’s the little things—like a squeeze of lemon—that make me realize how much I love this simple cookery.
The story behind this recipe
- This recipe came from a moment of trying to cook chicken on the grill after a long day—wanted something honest, no fuss, but still flavorful. I realized that focusing on simplicity and respecting the chicken’s delicate nature made all the difference. It’s not about marinating for hours or fancy sauces; it’s about using what’s in the pantry and paying attention to heat.
- One summer, I grabbed a chicken breast at the market, still warm from the farm. I threw it on the grill with just a sprinkle of salt and a squeeze of lemon. The smell of smoky meat mingling with citrus became an instant memory—made me think, this is the kind of meal I want to keep coming back to on lazy weekends or quick weeknight dinners.
- story_type
Historical & Cultural Tidbits
- Chicken breast, despite being a lean cut, has been a staple in many cultures for centuries due to its simplicity and versatility.
- Grilling chicken breasts became popular in the American South during backyard barbecues in the mid-20th century, emphasizing smoky flavor and quick prep.
- Historically, preserving chicken through methods like smoking and grilling helped extend its shelf life before refrigeration was common.
- The technique of pounding chicken to an even thickness, often used in grilling recipes, originated from European culinary traditions to ensure uniform cooking.
- Modern concerns about dry, overcooked chicken led to the development of specific techniques like brining and temperature control that have become standard in grilling.
Ingredient breakdown
- Chicken breast: I like to choose plump, uniform pieces—less uneven cooking, juicier bites. You can swap with thighs if you prefer more flavor, but be mindful of cook time and moisture content.
- Salt: It’s my secret weapon for flavor and moisture. Don’t skimp—use enough for a quick brine. You could try smoked salt for a subtle smoky note, but plain sea salt works best.
- Lemon: Brightens the meat with a zesty kick and helps tenderize. Skip it if citrus isn’t your thing, but consider a splash of vinegar instead for acidity.
- Olive oil: I brush it on for that crisp, golden crust. Avocado oil is a good substitute if you want a neutral, high-heat oil that won’t overpower the chicken.
- Herbs & spices: Usually just black pepper, maybe some garlic powder. Fresh herbs like thyme or rosemary add aromatic complexity—toss them on before grilling or just after for a fresh burst.
- Optional marinade: I skip marinating for a quick recipe, but a light brush of soy sauce or honey before grilling adds a nice umami or caramelized note. Just don’t overdo it, so it doesn’t burn.
- Cooking spray or oil: Keeps the chicken from sticking and helps with that crispy exterior. Use sparingly—over-oiling can lead to flare-ups and charred spots.
Spotlight on key ingredients
Chicken breast:
- I choose plump, uniform pieces for even cooking and juicy bites. Swap with thighs if you prefer more flavor, but adjust cook time.
- Salt: It’s my secret for flavor and moisture. Use enough for a quick brine. Smoked salt adds a subtle smoky note if you like a deeper aroma.
Lemon:
- Brightens and tenderizes with a zesty punch. Skip if citrus isn’t your thing, but consider vinegar for acidity and freshness.
- Olive oil: I brush it on for crisp, golden crust. Avocado oil works well if you want a neutral, high-heat alternative with less flavor.
Notes for ingredient swaps
- Dairy-Free: Skip butter or creamy marinades—use extra olive oil or a splash of coconut milk for moisture, but expect a slightly different flavor and richness.
- Low-Sodium: Use less salt in the brine and seasoning—your chicken might be less salty, so adjust with herbs and citrus for flavor punch.
- Herb Variations: Fresh thyme or oregano can replace rosemary or parsley—each adds its own aromatic twist, so choose based on your mood.
- Citrus Swap: Lime or orange juice can stand in for lemon—each offers a unique brightness and slightly different acidity profile.
- Oil Choices: Avocado or grapeseed oil can replace olive oil—these have higher smoke points and a more neutral flavor, good for high heat.
- Sweetener Addition: A touch of honey or maple syrup brushed on at the end adds caramelization, but watch for flare-ups—use sparingly.
- Pepper Type: Freshly cracked black pepper is classic, but white pepper provides a milder, more subtle heat—try both for variety.
Equipment & Tools
- Grill: To provide direct heat for searing and cooking.
- Meat thermometer: To check internal temperature for doneness.
- Tongs: To flip and handle the chicken safely.
- Small brush: To oil the chicken and prevent sticking.
- Plastic wrap and mallet: For pounding the chicken to even thickness.
Step-by-step guide to grilling chicken
- Equipment & Tools: Get your grill ready—clean grates, preheat to medium-high (about 200-230°C / 390-450°F). Have a meat thermometer, tongs, and a small brush at hand.
- Brine the chicken. Mix 1/4 cup salt with 4 cups water. Submerge the chicken breasts. Let sit for 15-20 minutes. Rinse and pat dry.
- Pound the chicken. Place each breast between two sheets of plastic wrap. Gently pound to even thickness (about 1.5 inches). This helps cook evenly.
- Season. Lightly brush with olive oil. Sprinkle with salt, pepper, and a squeeze of lemon for brightness. Optional: add minced garlic or herbs.
- Grill. Place the chicken on the hot grates. Grill for 4-6 minutes per side. Resist the urge to move it too much—let it sear.
- Check doneness. Use a meat thermometer—target 65°C / 149°F for juicy, cooked-through chicken. Alternatively, the juices should run clear and the surface golden.
- Rest. Transfer to a plate. Cover loosely with foil. Rest for 5 minutes to let juices redistribute and keep it tender.
- Serve. Slice against the grain. Drizzle with a little extra lemon or herbs if desired. Enjoy that smoky, tender bite.
Transfer the chicken to a plate. Cover loosely with foil and let rest for 5 minutes. Slice against the grain and serve immediately, enjoying the smoky aroma and juicy texture.
How to Know It’s Done
- Probe temp reaches 65°C / 149°F for safe, juicy meat.
- Surface is golden with visible grill marks and slight charring.
- Juices run clear when pierced, no pink inside.
Juicy Grilled Chicken Breast
Ingredients
Equipment
Method
- Mix the salt with water to create a quick brine, then submerge the chicken breasts. Let sit for 15–20 minutes, which helps keep the meat moist. Rinse and pat dry once done.
- Place each chicken breast between two sheets of plastic wrap and gently pound with a mallet until about 1.5 inches thick. This ensures even cooking and tender bites.
- Preheat your grill to medium-high heat (around 200–230°C or 390–450°F). Lightly brush the chicken with olive oil and season with freshly cracked black pepper, minced garlic, and a squeeze of lemon for brightness.
- Place the chicken breasts on the hot grill grates. Sear for 4–6 minutes without moving, until you see deep grill marks and the surface starts to caramelize.
- Flip the chicken with tongs and cook for another 4–6 minutes, maintaining a steady temperature. Use a meat thermometer to check for an internal temperature of 65°C (149°F). The outside should be golden with smoky char, and the meat firm but juicy.
- Transfer the grilled chicken to a plate, cover loosely with foil, and let rest for 5 minutes. This step allows juices to redistribute, ensuring moist, tender bites.
- Slice the chicken against the grain, drizzle with fresh lemon juice or herbs if desired, and serve warm for a smoky, juicy meal.
Pro tips for perfect grilled chicken
- sear: Make sure your grill grates are hot before placing the chicken down—listen for a sharp crackle and see good grill marks forming.
- Oil lightly: Use a high-smoke-point oil to brush the chicken; too much can cause flare-ups, so keep it minimal and even.
- Flip once: Resist the urge to move the chicken around; flipping only once ensures a better crust and even cooking.
- Use a thermometer: Check for 65°C / 149°F in the thickest part—saves you from overcooking and dryness.
- Rest properly: Let the chicken sit for 5 minutes after grilling; it’ll redistribute juices and stay moist when sliced.
- Avoid piercing: Don’t poke or prod the meat during cooking—this releases juices and makes it dry, so handle gently with tongs.
- Control heat: If flare-ups happen, move chicken to cooler parts of the grill or brush away flames with a spray of water.
Common mistakes and how to fix them
- OVERCOOKED: Use a thermometer to avoid drying out; pull at 65°C (149°F).
- UNDERSALTED: Salting early helps flavor penetrate; don’t skimp on the brine or seasoning.
- FLARE-UPS: Keep a spray bottle handy; spray with water to tame flames caused by excess oil.
- INCONSISTENT HEAT: Preheat grill thoroughly; direct medium-high heat ensures even searing.
Quick fixes and pantry swaps
- If chicken is dry, splash with warm broth to revive moisture quickly.
- When over-salted, rinse briefly and soak in water for 5 minutes, then pat dry.
- DUMPED marinade causes flare-ups—patch with a spray of water or oil on flames.
- When flare-ups occur, shield with a lid or move chicken to cooler grill zone.
- Splash with lemon juice or vinegar if meat is bland—adds brightness and cuts through richness.
Prep, store, and reheat tips
- Marinate the chicken breasts in salt and lemon juice up to 2 hours ahead for extra flavor and tenderness, which helps keep the meat moist even after grilling.
- Prep the brine in advance by dissolving salt in water; store in the fridge for up to 24 hours, ready to submerge chicken when needed.
- Season and oil the chicken just before grilling; if done earlier, keep covered in the fridge for up to 12 hours to preserve the fresh aroma.
- Cooked chicken can be stored in an airtight container in the fridge for up to 3 days—reheat gently to avoid drying out, aiming for warm, not hot, to maintain juiciness.
- Reheat the chicken in a covered skillet over low heat, or in the oven at 150°C (300°F), until just warmed through—look for the juices to shimmer and smell the smoky aroma again.
Top questions about grilled chicken
1. How do I know when my chicken is done on the grill?
Use a meat thermometer to check for 65°C (149°F); it ensures juiciness without overcooking.
2. Should I brine chicken before grilling?
Brine the chicken in salt water for 15-20 minutes before grilling; it keeps the meat moist and tender.
3. How hot should my grill be for chicken?
Preheat your grill to medium-high, around 200-230°C (390-450°F). It helps get a good sear without burning.
4. Why do I need to pound the chicken breast?
Pound the chicken to an even thickness of about 1.5 inches. It cooks evenly and stays juicy.
5. How long should I rest the chicken after grilling?
Rest the chicken covered loosely with foil for 5 minutes after grilling to keep it juicy.
6. What kind of chicken breast should I choose?
Use fresh, plump chicken breasts with uniform size for even cooking and better texture.
7. How should I oil and season the chicken?
Brush the chicken lightly with oil and season just before grilling; too much oil can cause flare-ups.
8. Why does my chicken stick to the grill?
If the chicken sticks, clean and oil your grill grates well beforehand. Avoid moving it prematurely.
9. Can I add citrus to chicken before grilling?
A splash of lemon or vinegar brightens the flavor and tenderizes the meat—add just before grilling.
10. What should I do if flames flare up?
Keep an eye on flare-ups by reducing heat or moving chicken to cooler grill zones to prevent charring.
Grilled chicken breast might seem straightforward, but nailing that perfect juicy, smoky bite takes a bit of attention. Once you get the hang of the heat and timing, it’s a reliable fixture for quick dinners or outdoor gatherings. I keep coming back to this approach because it’s honest and forgiving enough to serve even when I’m not feeling overly meticulous.
In the end, it’s those simple, honest flavors that stick with you—the lemon brightness, the smoky char, that tender, moist bite. No fuss, no complicated marination—just good techniques and a bit of patience. That’s what makes this recipe a keepsake in my weekly rotation, season after season.

Hi, I’m Daniel Whitaker, the voice and recipe developer behind Broth Psychologist. I’m so glad you’re here. This little corner of the internet started as a way for me to share comfort through cooking, but it has grown into something much deeper.
 Hi, I’m Daniel Whitaker, the voice and recipe developer behind Broth Psychologist. I’m so glad you’re here.
This little corner of the internet started as a way for me to share comfort through cooking, but it has grown into something much deeper.
It’s where food meets feeling, and where simple ingredients tell meaningful stories.
Hi, I’m Daniel Whitaker, the voice and recipe developer behind Broth Psychologist. I’m so glad you’re here.
This little corner of the internet started as a way for me to share comfort through cooking, but it has grown into something much deeper.
It’s where food meets feeling, and where simple ingredients tell meaningful stories.


