This cheese ball recipe is my twist on a nostalgic classic, but with a little surprise. I love how a simple mix of cream cheese and sharp cheddar can turn into something both familiar and new when you toss in unexpected herbs and a secret ingredient. It’s the kind of dish that makes you smile before you even taste it.
There’s something about rolling a cheese ball in crunchy bits that feels like a small celebration. Plus, it’s so easy to customize—whether you want more spice, herbs, or a bit of smoky flavor. It’s perfect for when friends drop by or when you need a little comfort food with a twist.
Focusing on the nostalgic charm of a classic cheese ball, but with a twist—using unexpected herbs and a secret ingredient to elevate its flavor and make it feel fresh and exciting again.
Nostalgic cheese ball with a twist
- The first time I rolled this cheese ball in toasted pecans, I felt like I’d discovered a new flavor dimension.
- There’s a quiet joy in watching a simple mixture turn into something festive with just a few herbs and a crunchy coat.
- I get a little twinge of pride knowing this recipe always gets rave reviews at gatherings, even when I’m rushing.
- Sometimes, I toss in whatever herbs I have—basil, thyme, or even a pinch of smoked paprika—and it feels like improvising art.
- This cheese ball reminds me of childhood parties, but with a grown-up twist that makes it feel special every time.
Story behind this cheese ball
- This cheese ball recipe was born out of a lazy Sunday afternoon when I realized I had a bunch of leftover herbs and a block of cream cheese that needed using up. Instead of just spreading it on crackers, I thought, why not shape it into a ball and roll it in something crunchy? That little idea turned into a tradition that’s now a go-to for casual gatherings.
- I remember the first time I made it for friends, nervously trying to balance flavors—adding herbs I loved and a secret smoky element. Watching everyone dig in and ask for the recipe made me realize how a simple dish can bring a little joy and nostalgia, especially when it’s made with a bit of love and a pinch of improvisation.
- heading
- Story behind this cheese ball
Cheese ball trivia and history
- The cheese ball gained popularity in mid-20th century America as a festive party appetizer, especially during the 1950s and 60s.
- Originally, cheese balls were often rolled in nuts or dried herbs, making them both flavorful and eye-catching on buffet tables.
- This dish is believed to have roots in European cheese spreads, but American hosts made it more portable and fun by shaping it into a ball.
- Quirky trivia: Some vintage recipes included ingredients like Worcestershire sauce or even finely chopped pickles for extra zing.
Ingredient breakdown: key components
- Cream cheese: I love how it becomes incredibly silky and spreads easily—aim for softened, not melted, for the best texture. Swap with Greek yogurt for a tangier, lighter version if you like.
- Sharp cheddar: Its strong, nutty flavor really shines through, giving the ball a punch. Use smoked gouda if you want a mellower, smoky depth.
- Herbs: Fresh parsley and chives brighten the mixture with a clean, grassy note—and remind me of garden freshness. Dried herbs work in a pinch but lose that vibrant punch.
- Secret ingredient (smoked paprika): Adds a subtle smoky warmth that’s not obvious at first bite—look for the vibrant red powder, it’s key for that cozy flavor.
- Crunchy coat (toasted pecans or walnuts): I prefer toasted because they bring out a toasty aroma and a satisfying crunch. Skip if nut allergies are a concern, maybe use crispy fried onions instead.
- Seasoning: Salt and black pepper are essential, but a dash of cayenne or hot sauce can turn up the heat if you’re feeling bold. Taste as you go—these are the flavor anchors.
Spotlight on key ingredients
Cream cheese and cheddar:
- Cream cheese: I love how it becomes incredibly silky and spreads easily—aim for softened, not melted, for the best texture. Swap with Greek yogurt for a tangier, lighter version if you like.
- Sharp cheddar: Its strong, nutty flavor really shines through, giving the ball a punch. Use smoked gouda if you want a mellower, smoky depth.
Fresh herbs and smoked paprika:
- Herbs: Fresh parsley and chives brighten the mixture with a clean, grassy note—and remind me of garden freshness. Dried herbs work in a pinch but lose that vibrant punch.
- Secret ingredient (smoked paprika): Adds a subtle smoky warmth that’s not obvious at first bite—look for the vibrant red powder, it’s key for that cozy flavor.
Notes for ingredient swaps
- Dairy-Free: Swap cream cheese for dairy-free cream cheese or mashed avocado. The texture will be a bit different, creamier or greener, but still tasty.
- Cheddar Cheese: Use a milder cheese like Monterey Jack or a more pungent blue cheese for a stronger flavor. The sharpness can really change the profile.
- Herbs: Substitute fresh herbs with dried ones—reduce the amount by half since dried herbs are more concentrated. Basil or dill work well for different flavor notes.
- Secret Ingredient (Smoked Paprika): Replace with chipotle powder for a smoky, spicy kick, or omit for a milder, more traditional flavor.
- Crunchy Coat: Use chopped toasted almonds or crispy fried onions if nuts aren’t your thing. They add crunch but different flavor and texture.
- Seasoning: Add a squeeze of lemon juice or a dash of hot sauce to brighten or spice up the flavor. Adjust to taste for balance.
- Additional Flavor: Incorporate cooked bacon bits or chopped sun-dried tomatoes for extra savory or umami punch.
Equipment & Tools
- Large mixing bowl: Combine and mix ingredients thoroughly.
- Spatula: Stir and fold ingredients smoothly.
- Baking sheet: Bake the coated cheese ball evenly.
- Shallow dish: Roll the cheese ball in nuts for an even coating.
- Oven: Heat and bake for a crispy exterior.
Step-by-step guide to cheese ball
- Gather your equipment: a large mixing bowl, a spatula, a baking sheet, and a shallow dish for rolling. Preheat your oven to 180°C (350°F).
- In the bowl, combine 8 oz softened cream cheese, 1 cup shredded sharp cheddar, and 2 tablespoons chopped fresh herbs (parsley, chives). Mix until well integrated, about 2 minutes. Taste and adjust salt and pepper as needed.
- Shape the mixture into a compact ball, about 3 inches in diameter. Wrap in plastic wrap and chill in the fridge for 30 minutes to firm up.
- While the cheese mixture chills, toast 1/2 cup chopped pecans on a dry skillet over medium heat (about 3-4 minutes). Keep an eye on them; they should turn golden and smell nutty.
- Place the toasted pecans in a shallow dish. Remove the cheese ball from the fridge and roll it in the nuts, pressing gently to coat evenly. Return to the fridge for another 15 minutes.
- For a crispy finish, preheat your oven to 180°C (350°F). Bake the coated cheese ball on a parchment-lined baking sheet for 10-12 minutes, until the outside is slightly golden and fragrant.
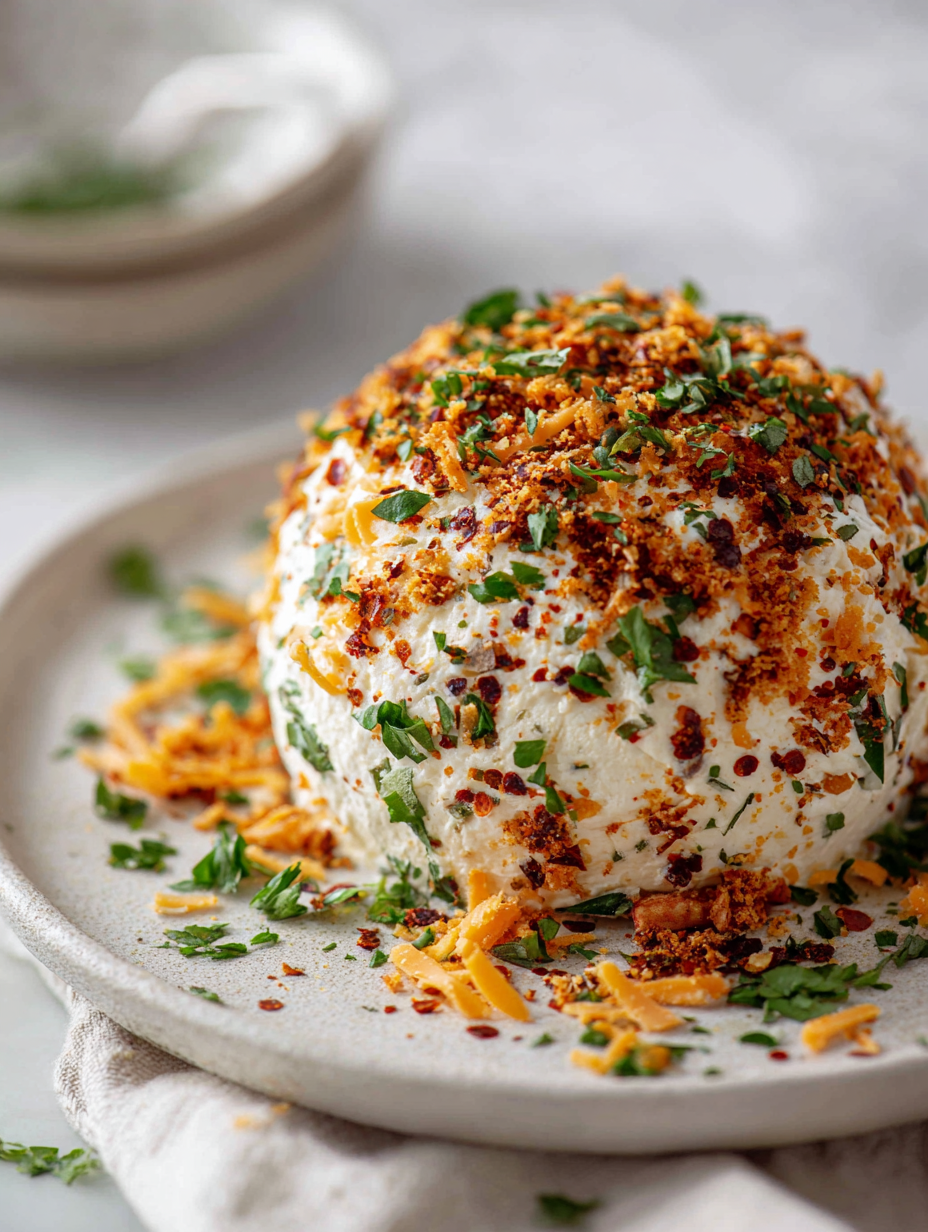
- Remove from oven and let rest for 5 minutes. Transfer to a serving plate, and garnish with additional herbs if desired. Serve with crackers or sliced baguette.
- To serve, slice into wedges, checking for a creamy interior and crunchy nut exterior. The cheese should be soft but hold shape, with a fragrant, cheesy aroma.
Chill the cheese ball for at least 30 minutes before rolling. After baking, let it rest for 5 minutes to set. Serve on a platter with accompaniments for a casual, inviting presentation.
How to Know It’s Done
- Cheese mixture is smooth and cohesive without cracks.
- Nuts are toasted golden and aromatic.
- Cheese ball is firm enough to hold shape but still creamy inside.
Nostalgic Herb and Smoked Paprika Cheese Ball
Ingredients
Equipment
Method
- Combine the softened cream cheese, shredded cheddar, chopped herbs, smoked paprika, salt, and black pepper in a large mixing bowl. Mix thoroughly with a spatula until the mixture is smooth, fragrant, and well integrated.
- Shape the mixture into a compact ball, about 3 inches in diameter, using your hands or a spatula. Wrap it tightly in plastic wrap and refrigerate for about 30 minutes to firm up.
- While the cheese ball chills, toast the chopped pecans in a dry skillet over medium heat for 3-4 minutes until golden and fragrant. Keep an eye on them so they don’t burn.
- Remove the cheese ball from the fridge and roll it gently in the toasted pecans, pressing lightly to ensure an even coating. Place the coated ball on a baking sheet lined with parchment paper and refrigerate for another 15 minutes.
- Preheat your oven to 180°C (350°F). Bake the coated cheese ball on the prepared baking sheet for 10-12 minutes until it turns slightly golden and fragrant, with a crunchy exterior.
- Remove the cheese ball from the oven and let it rest for 5 minutes. Transfer to a serving plate, and if desired, sprinkle extra herbs or smoked paprika on top for presentation.
- Serve slices of the cheese ball with crackers or sliced baguette. Enjoy the warm, creamy interior contrasted with the crunchy nut coating for a festive and flavorful appetizer.
Tips for perfect cheese ball
- Chill the mixture: Keep it cold to make shaping easier and prevent melting during coating.
- Toast nuts thoroughly: Golden and fragrant nuts add a warm, smoky flavor and crunchy texture.
- Use softened cream cheese: Ensures smooth mixing; avoid melted or cold for best cohesion.
- Adjust herbs generously: Fresh herbs brighten the flavor—don’t be shy, they should be vibrant and fragrant.
- Bake until golden: The exterior should crackle slightly and smell toasted, signaling perfect doneness.
- Gently roll in nuts: Press firmly but gently to ensure an even, crunchy coat that sticks well.
- Rest before serving: Let the cheese ball sit for 10 minutes to settle, making slicing cleaner and easier.
Common mistakes and how to fix them
- FORGOT to chill the cheese ball before coating? Chill for at least 30 minutes for firm shaping.
- DUMPED too many nuts into the mixture? Use a light hand—coat evenly for crunch without overwhelming flavor.
- OVER-TORCHED nuts? Toast until golden, then immediately remove to prevent bitterness.
- MISSED the temperature? Bake at 180°C (350°F) until golden and fragrant, about 10-12 minutes.
Quick fixes and pantry swaps
- If/When the cheese ball cracks, gently press it back together and chill for 10 minutes.
- Splash a little lemon juice if herbs turn bitter or dull in flavor.
- Patch over burnt nuts with fresh, toasted ones for a brighter crunch.
- Shield the cheese ball with plastic wrap if it starts to dry out in the fridge.
- When in doubt, swap nuts for crispy fried onions to add crunch and a savory aroma.
Prep, store, and reheat tips
- You can prepare the cheese mixture a day ahead; keep it tightly wrapped in the fridge to retain freshness and prevent drying out.
- Chill the formed cheese ball for at least 30 minutes before coating; this helps it hold shape and makes rolling easier.
- Store the coated cheese ball in an airtight container in the fridge for up to 24 hours. The flavors meld and intensify overnight.
- Reheat by letting it sit at room temperature for 15 minutes or briefly warming in a 150°C (300°F) oven for 5-7 minutes until slightly warm and fragrant. The texture should be creamy and inviting—avoid overheating to prevent melting.
Top questions about cheese balls
1. Should I use softened or melted cream cheese?
Use softened cream cheese for smooth mixing, and avoid melting it completely. It makes shaping easier and results in a creamier texture.
2. Can I substitute cream cheese with something else?
Yes, you can substitute Greek yogurt or mascarpone for a different flavor and slightly lighter texture, but expect a bit less richness.
3. What herbs work best in a cheese ball?
Add herbs like parsley, chives, or dill for freshness. If dried herbs, reduce the quantity by half since they’re more concentrated.
4. How do I toast nuts properly?
Toast nuts in a dry skillet over medium heat until golden and fragrant—about 3-4 minutes—then roll the cheese ball in them for crunch.
5. How do I know when the cheese ball is done baking?
Bake the coated cheese ball at 180°C (350°F) for 10-12 minutes until golden and fragrant. It should crackle slightly and smell toasted.
6. How far in advance can I prepare a cheese ball?
Wrap the shaped cheese ball tightly with plastic wrap and chill for at least 30 minutes to firm up before coating or serving.
7. What if my nuts burn or the cheese cracks?
If nuts burn, immediately remove from heat and toast fresh ones. If the cheese cracks, gently press it back together and chill again.
8. How can I customize my cheese ball?
For extra flavor, add a dash of hot sauce, smoked paprika, or chopped cooked bacon into the mixture before shaping.
9. Can I make a cheese ball ahead of time?
Store the finished cheese ball in an airtight container in the fridge for up to 24 hours. Reheat briefly at 150°C (300°F) if needed.
10. How do I serve and cut the cheese ball?
Use a sharp knife to cut slices cleanly. Let the cheese ball sit at room temperature for 10-15 minutes before serving for best flavor and texture.
This cheese ball isn’t just a nostalgic treat; it’s a little project that invites you to get creative with herbs and textures. Its crunchy exterior and creamy center make it a satisfying bite, especially when shared with friends or family. Sometimes, it’s the simple dishes that spark the best conversations and memories.
In the end, this recipe is about comfort, fun, and a bit of improvisation. Whether you stick to the classic or add your own twist, it’s guaranteed to bring a little joy and maybe even a few nostalgic smiles to your table.

Hi, I’m Daniel Whitaker, the voice and recipe developer behind Broth Psychologist. I’m so glad you’re here. This little corner of the internet started as a way for me to share comfort through cooking, but it has grown into something much deeper.
 Hi, I’m Daniel Whitaker, the voice and recipe developer behind Broth Psychologist. I’m so glad you’re here.
This little corner of the internet started as a way for me to share comfort through cooking, but it has grown into something much deeper.
It’s where food meets feeling, and where simple ingredients tell meaningful stories.
Hi, I’m Daniel Whitaker, the voice and recipe developer behind Broth Psychologist. I’m so glad you’re here.
This little corner of the internet started as a way for me to share comfort through cooking, but it has grown into something much deeper.
It’s where food meets feeling, and where simple ingredients tell meaningful stories.


